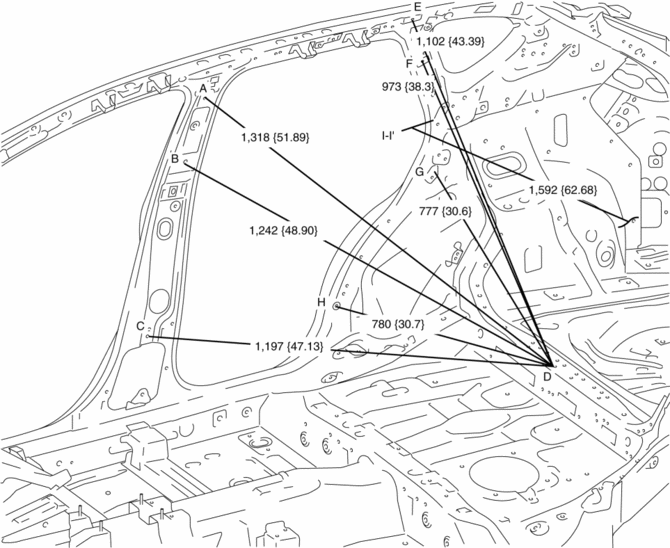
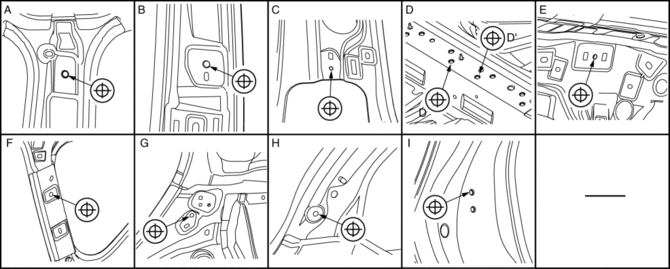
Mazda CX-5 Service & Repair Manual: Room Straight Line Dimensions (2) [Dimensions]
|
Point symbol |
Designation |
Hole diameter or bolt or nut size mm {in} |
|
A |
Front seat belt upper anchor installation |
?14 {0.55} |
|
B |
Front seat belt upper anchor installation |
?14 {0.55} |
|
C |
Center pillar inner datum hole |
?7 {0.3} |
|
D |
Rear seat installation hole |
?14 {0.55} |
|
E |
Rear pillar inner datum hole |
?7 {0.3} |
|
F |
C-pillar trim installation hole |
?10 {0.39} |
|
G |
Trunk side trim installation hole |
?8.6 {0.34} |
|
H |
Rear pillar inner datum hole |
?8.6 {0.34} |
|
I |
Rear door striker installation hole |
?13 {0.51} |
 Room Straight Line Dimensions (1) [Dimensions]
Point symbol
Designation
Hole diameter or bolt or nut size mm {in}
A
Front pillar inner datum hole
?7 {0.3}
...
 Room Straight Line Dimensions (3) [Dimensions]
Point symbol
Designation
Hole diameter or bolt or nut size mm {in}
A
Rear seat installation hole
?14 {0.55}
...
Other materials:
Front Body Straight Line Dimensions (1) [Dimensions]
Point symbol
Designation
Hole diameter or bolt or nut size mm {in}
A
Cowl panel installation hole
?5 {0.2}
B
Wiper bracket datum hole
?7 {0.3}
C
...
Brake Fluid Pressure Sensor
Purpose/Function
The brake fluid pressure sensor detects the fluid pressure from the master
cylinder and transmits it to the DSC HU/CM.
Construction
The brake fluid pressure sensor is built into the DSC HU/CM. Therefore if
there is any malfunction of the brake fluid pressur ...
Center Roof Antenna Inspection
NOTE:
The center roof antenna is integrated with the antenna amplifier.
Antenna amplifier inspection
1. Disconnect the negative battery cable..
2. Remove the following parts:
a. Front scuff plate.
b. Rear scuff plate.
c. B-pillar lower trim.
d. Front seat belt adjusting cove ...
