Mazda CX-5 Service & Repair Manual: Air Fuel Ratio (A/F) Sensor Removal/Installation
WARNING:
-
A hot engine and exhaust system can cause severe burns. Turn off the engine and wait until they are cool before removing the exhaust system.
CAUTION:
-
Do not allow flammable objects such as the taping for bundling wiring harness to come into contact with the exhaust manifold and silencer.
NOTE:
-
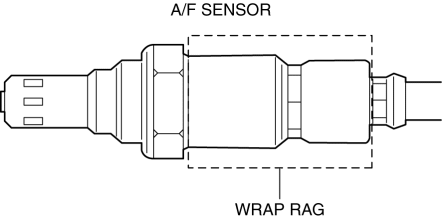
If penetrant lubricating spray penetrates the airflow hole of the A/F sensor, it could cause interference with the A/F sensor function.
-
When removing the A/F sensor, wrap a rag around the lower position so that penetrant lubricating spray does not get sprayed into the airflow hole.
1. Disconnect the negative battery cable..
2. Remove the plug hole plate..
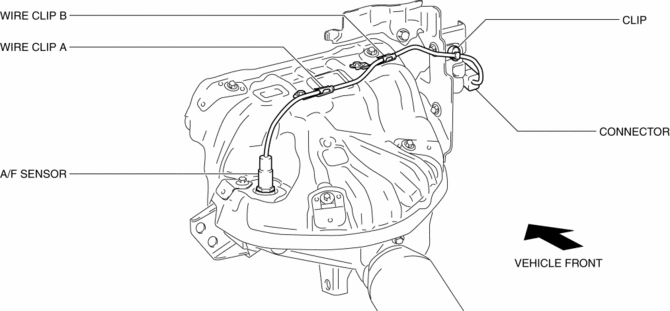
3. Disconnect the A/F sensor connector.
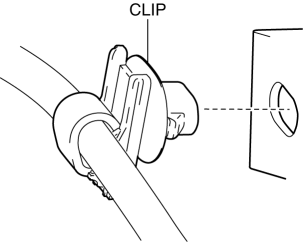
4. Remove the clip from the heat insulator.
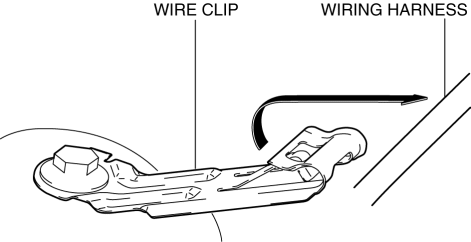
5. Remove the wiring harness from the wire clip A and B..
6. Remove the A/F sensor using the SST
.
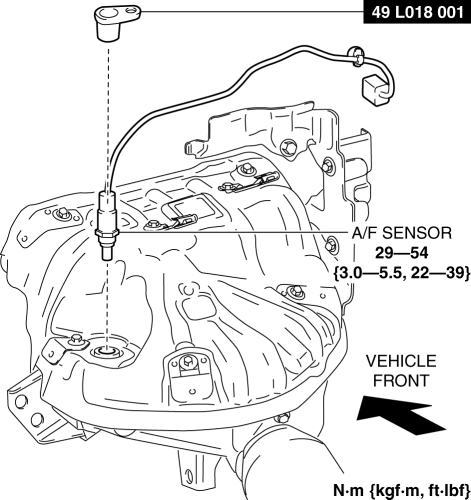
7. Install in the reverse order of removal.
Assembly of Wiring Harness to Wire Clip Note
-
Secure the heat shrinkable tube on the wiring harness to wire clip A.
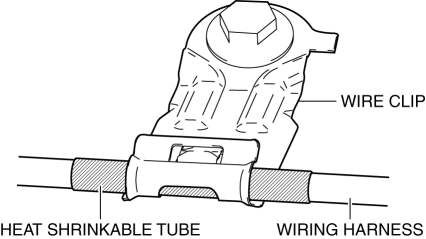
-
Secure the band on the wiring harness so that the band is positioned on both sides of wire clip B.

 Air Fuel Ratio (A/F) Sensor Inspection
A/F Sensor Inspection
1. Connect the M-MDS to the DLC?2.
2. Switch the ignition ON (engine on).
3. Warm up the engine to normal operating temperature.
4. Access the following PIDs using the M-M ...
 Air Fuel Ratio (A/F) Sensor
Purpose/Function
Detects the oxygen concentration (all-range air/fuel ratio) in the exhaust
gas as basic information for mainly determining the fuel injection amount.
Detects the oxy ...
Other materials:
Floor Under Cover Removal/Installation
1. Lift up the vehicle.
2. Remove bolts A.
3. Remove fasteners B.
4. Remove the floor under cover No.1.
5. Remove nuts C.
6. Remove fasteners D.
7. Remove bolts E.
8. Remove the floor under cover No.2.
9. Remove bolts F.
10. Remove the fastener G.
11. Remove the floor ...
Front Buckle Removal/Installation
Driver-side
1. Disconnect the negative battery cable and wait for 1 min or more..
2. Remove the front seat..
3. Disconnect the front buckle connector.
4. Remove the bolt.
5. Remove the front buckle.
6. Install in the reverse order of removal.
Passenger-side (with buckle switch) ...
Oil Pressure Switch Removal/Installation [Fw6 A EL, Fw6 Ax EL]
WARNING:
A hot transaxle and ATF can cause severe burns. Turn off the engine and wait
until they are cool.
Always wear protective eye wear when using the air compressor. If the air
compressor is used, any particles of dirt or soiling could spatter and get into
the eyes.
...
