Mazda CX-5 Service & Repair Manual: Ventilator Grille Removal/Installation
Side Ventilator Grille
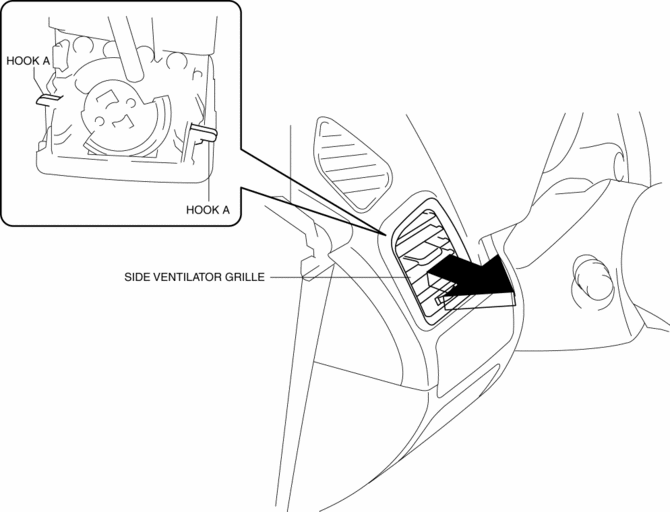
Driver-side
1. Disconnect the negative battery cable..
2. Remove the switch panel..
3. Insert your hand from the area where the switch panel was installed, remove the side ventilator grille in the direction of the arrow shown in the figure while detaching hooks A.
4. Install in the reverse order of removal.
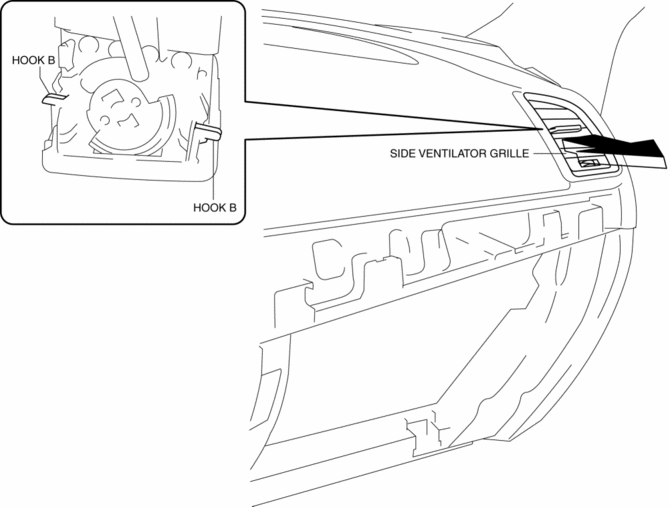
Passenger-side
1. Disconnect the negative battery cable..
2. Open the glove compartment.
3. Remove the glove compartment..
4. Insert your hand from the area where the glove compartment was installed, remove the side ventilator grille in the direction of the arrow shown in the figure while detaching hooks B.
5. Install in the reverse order of removal.
Center Ventilator Grille
1. Disconnect the negative battery cable..
2. Remove the decoration panel..
3. Push the edge of center ventilator grille in the direction of arrow (1) and detach hooks C.
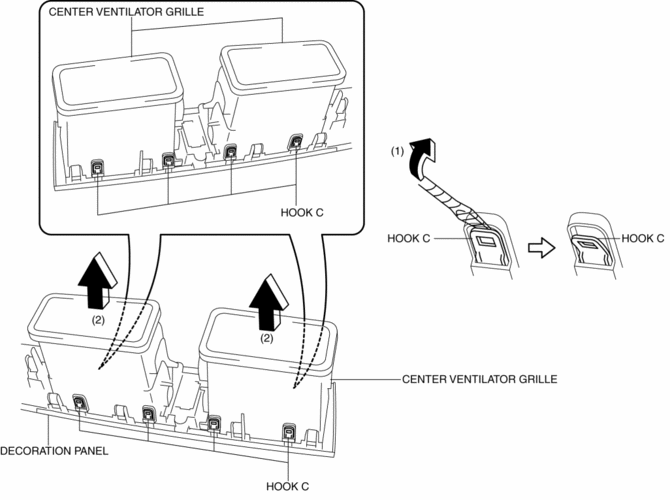
4. Remove the center ventilator grille in the direction of arrow (2) shown in the figure.
5. Install in the reverse order of removal.
 Upper Cowl Side Reinforcement Removal [Panel Replacement]
Symbol Mark
Removal Procedure
1. Drill the 13 locations indicated by (A) shown in the figure.
2. Drill the 8 locations indicated by (B) shown in the figure.
NOTE:
When a drill the 8 ...
 Frame
Frame
...
Other materials:
Tire Maintenance
Improper or inadequate vehicle maintenance can cause tires to wear abnormally.
Here are some important maintenance points:
Tire Inflation Pressure
Inspect all tire pressure monthly (including the spare) when the tires are cold.
Maintain recommended pressures for the best ride, top handling, an ...
Clock Spring Inspection [Two Step Deployment Control System]
1. Disconnect the negative battery cable and wait for 1 min or more..
2. Remove the driver?side air bag module..
3. Remove the steering wheel..
4. Remove the column cover..
5. Remove the clock spring..
6. Verify that the continuity is as indicated in the table.
If not as indicated ...
Lumber Support Motor Removal/Installation
WARNING:
Handling a side air bag improperly can accidentally operate (deploy) the
air bag, which may seriously injure you. Read the service warnings/cautions
in the Workshop Manual before handling the front seat (side air bag integrated)..
If the sliding mechanisms on both side ...
