Mazda CX-5 Service & Repair Manual: Turn Light System
Purpose
-
The turn light system flashes the turn light three times automatically according to the turn switch operation.
-
The front body control module (FBCM) performs turn light system fail-safe..
Function
-
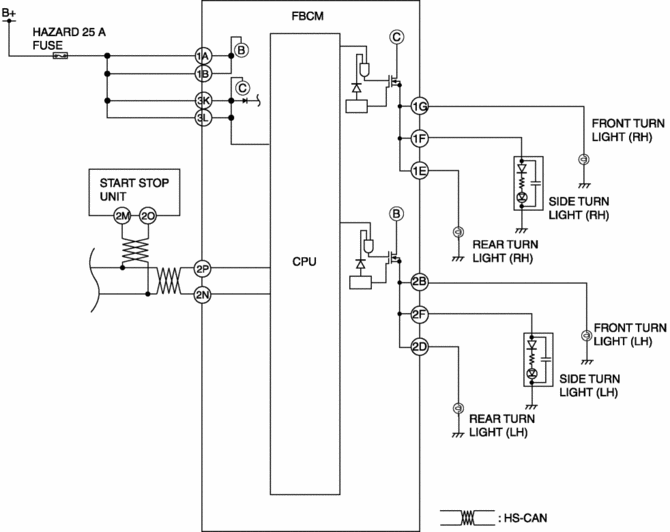
The front body control module (FBCM) performs control based on the turn switch (RH or LH) signal sent from the start stop unit via the CAN signal as follows:
-
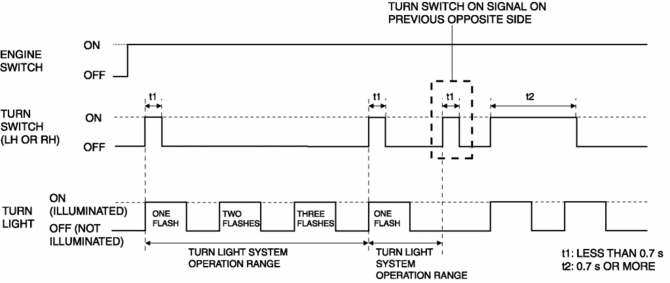
On-signal receive time of turn switch is less than 0.7 s: Operates the turn light system.
-
On-signal receive time of turn switch is 0.7 s or more: Flashes the turn light according to the receive time.
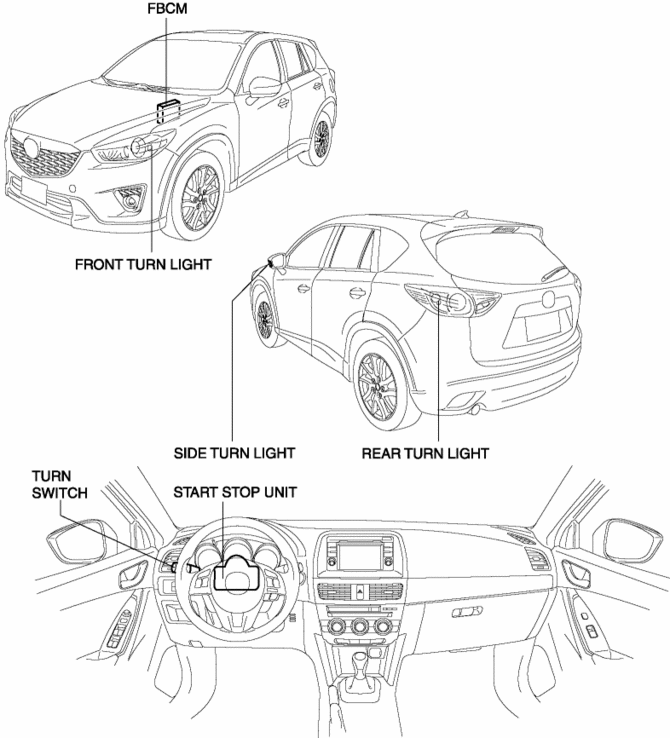
Structural view
System wiring diagram
Operation
-
If the front body control module (FBCM) receives the turn switch on signal from the start stop unit for less than 0.7 s when the ignition is switched ON (engine off or on), it flashes the turn light three times.
-
If the front body control module (FBCM) receives the turn switch on signal from the previous opposite side during the turn light system operation, it stop the turn light system operation. In addition, if the turn switch on signal on the opposite side is less than 0.7 s, the turn light system does not operate.
 Side Turn Light Removal/Installation
1. Disconnect the negative battery cable..
2. Remove the following parts:
a. Outer mirror glass.
b. Upper outer mirror garnish.
3. Remove the screws.
4. Disconnect the connector.
5. Re ...
 Vanity Mirror Illumination Inspection
1. Disconnect the negative battery cable..
2. Remove the sunvisor..
3. Verify that the continuity between the vanity mirror illumination terminals
is as indicated in the table.
I ...
Other materials:
Discharge Headlight System Inspection
WARNING:
Incorrect servicing of the discharge headlights could result in electrical
shock. Before servicing the discharge headlights, always refer to the service
warnings..
Terminal layout
Inspection procedure
Step
Inspection
Actio ...
Electrical System
Electrical Parts
Battery cable
Before disconnecting connectors or removing electrical parts, disconnect
the negative battery cable.
Wiring Harness
To remove the wiring harness from the clip in the engine room, pry up the
hook of the clip using a flathead screwdriver. ...
Oil Pump [Fw6 A EL, Fw6 Ax EL]
Purpose/Function
The oil pump generates hydraulic pressure in the oil line of the automatic
transaxle together with supplying lubrication to powertrain related parts.
Construction
The oil pump has adopted a gear type with built-in outer and inner rotors.
The inner roto ...
