Mazda CX-5 Service & Repair Manual: Evaporative Emission (Evap) Control System
Purpose, Outline
-
Prevents release of evaporative gas into the atmosphere.
-
The intake manifold vacuum introduces evaporative gas to the intake manifold via the charcoal canister and the purge solenoid valve.
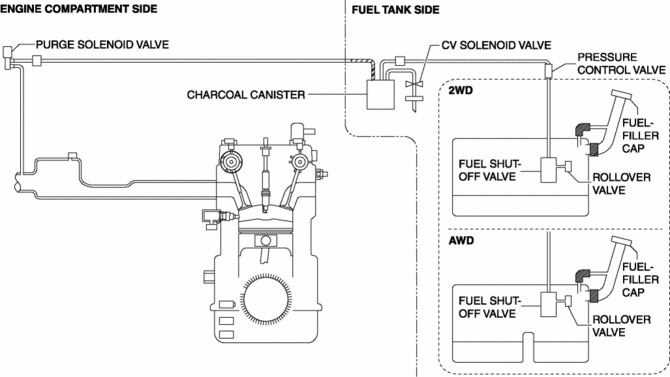
System Diagram
U.S.A. and CANADA
Except U.S.A. and CANADA
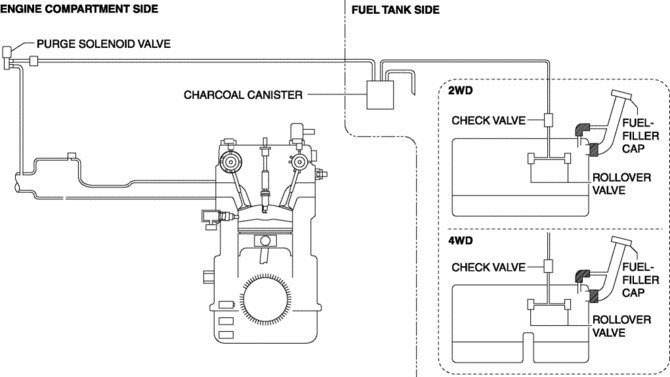
Structure
-
The evaporative emission control system consists of the following parts:
|
Part name |
Reference |
|
Purge solenoid valve |
(See PURGE SOLENOID VALVE [SKYACTIV-G 2.0].) |
|
Catch tank |
(See CATCH TANK [SKYACTIV-G 2.0].) |
|
Charcoal canister |
(See CHARCOAL CANISTER [SKYACTIV-G 2.0].) |
|
Pressure control valve |
(See PRESSURE CONTROL VALVE [SKYACTIV-G 2.0].) |
|
Fuel shut-off valve |
(See FUEL SHUT-OFF VALVE [SKYACTIV-G 2.0].) |
|
Rollover valve |
(See ROLLOVER VALVE [SKYACTIV-G 2.0].) |
|
Fuel-filler cap |
(See FUEL-FILLER CAP [SKYACTIV-G 2.0].) |
|
CV solenoid valve |
(See CANISTER VENT (CV) SOLENOID VALVE [SKYACTIV-G 2.0].) |
Except U.S.A. and CANADA
|
Part name |
Reference |
|
Purge solenoid valve |
(See PURGE SOLENOID VALVE [SKYACTIV-G 2.0].) |
|
Catch tank |
(See CATCH TANK [SKYACTIV-G 2.0].) |
|
Charcoal canister |
(See CHARCOAL CANISTER [SKYACTIV-G 2.0].) |
|
Check valve |
(See CHECK VALVE [SKYACTIV-G 2.0].) |
|
Rollover valve |
(See ROLLOVER VALVE [SKYACTIV-G 2.0].) |
|
Fuel-filler cap |
(See FUEL-FILLER CAP [SKYACTIV-G 2.0].) |
 Engine Control System
Outline
L-jetronic*1 and D-jetronic*2 type detectors have been combined for intake
air amount detection, improving the accuracy of the intake air amount measurement.
MAF sensor ...
 Fuel Injection Control System
Outline
Performs optimum fuel injection according to engine operation conditions.
The PCM determines the engine operation conditions based on the signals from
each input device and d ...
Other materials:
Positive Crankcase Ventilation (PCV) Valve Inspection
Airflow Inspection
1. Disconnect the section (A) of ventilation hose shown in the figure.
2. Start the engine and verify that vacuum is applied to the end of the disconnected
ventilation hose while the engine is idling.
If vacuum is not applied to the ventilation hose, perform the p ...
Dynamic Stability Control (DSC)
Outline
Electrical brake assist control has been adopted, improving safety.
The DSC HU/CM, integrating both the hydraulic unit (HU) and control module
(CM), has been adopted, resulting in a size and weight reduction.
An enhanced malfunction diagnosis system, used with the M ...
Fuel Gauge Sender Unit Removal/Installation [Awd]
WARNING:
Always keep sparks and flames away from fuel when servicing the fuel system.
Fuel can be easily ignited which could cause serious injury or death, and damage
to equipment.
Fuel line spills and leakage from the pressurized fuel system are dangerous.
Fuel can ignite a ...
