Mazda CX-5 Service & Repair Manual: Turn And Hazard Indicator Alarm
Purpose
-
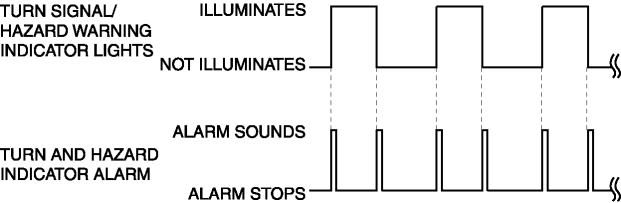
The turn and hazard indicator alarm notifies the driver that a turn light or the hazard warning lights are flashing.
Function
-
When the instrument cluster receives the turn signal/hazard warning indicator light illumination request signal sent from the front body control module (FBCM) via the CAN signal, the turn and hazard indicator alarm sounds simultaneously with illumination on/off of the direction/hazard warning indicator lights.
-
The turn and hazard indicator alarm sound pattern is as follows:
|
Sound frequency (Hz) |
Alarm when turn signal/hazard warning indicator lights illumination off > on: 1,400 Alarm when turn signal/hazard warning indicator lights illumination on > off: 1,300 |
|
Sound frequency |
Continuously |
|
Wave pattern |
|
Construction
-
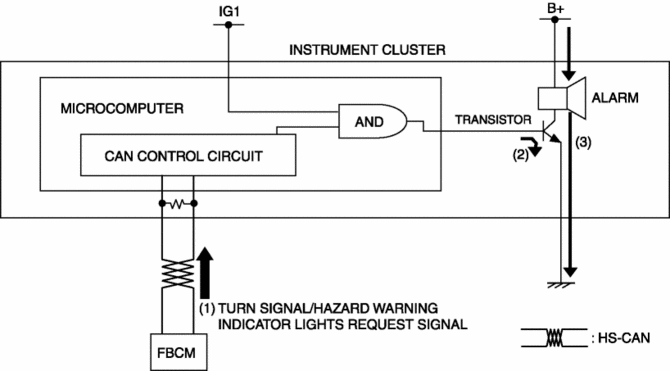
The turn and hazard indicator alarm sounds using the buzzer built into the instrument cluster.
Construction, Operation
1. The instrument cluster receives (1) the turn signal/hazard warning indicator light request signal from the front body control module (FBCM).
2. The instrument cluster microcomputer turns the transistor on (2) based on the turn signal/hazard warning indicator light request signal.
3. When the transistor turns on, a ground circuit with the alarm is established and the alarm sounds (3).
Fail-safe
-
Function not equipped.
 Taillight Bulb Removal/Installation
1. Disconnect the negative battery cable..
2. Insert a tape-wrapped flathead screwdriver into the service hole in the position
shown in the figure.
3. Move the flathead screwdriver in the di ...
 Turn Signal/Hazard Warning Indicator Lights
Purpose
Notifies the driver that a turn light, the hazard warning lights are flashing.
Function
Flashes according to the turn switch and hazard warning switch operations.
Con ...
Other materials:
Hazard Warning Flasher
The hazard warning lights should always be used when you stop on or near a roadway
in an emergency.
The hazard warning lights warn other drivers that your vehicle is a traffic hazard
and that they must take extreme caution when near it.
Depress the hazard warning flasher and all the turn sig ...
Blind Spot Monitoring (Bsm) System
Outline
The blind spot monitoring (BSM) system detects vehicles approaching from
the rear blind spots, and illuminates the BSM indicator light on the outer mirror
glass. When the BSM indicator light is illuminated and the turn light switch
is turned on to the side in which the indica ...
Hood Release Cable Removal/Installation
1. Disconnect the negative battery cable..
2. Remove the following parts:
a. Front bumper.
b. Front combination light (LH).
c. Front mudguard (LH).
d. Hood release lever.
3. Disconnect the hood release cable from the hood latch.
4. While pressing the tabs of the clip in the direction o ...
