Mazda CX-5 Service & Repair Manual: Taillight Bulb Removal/Installation
1. Disconnect the negative battery cable..
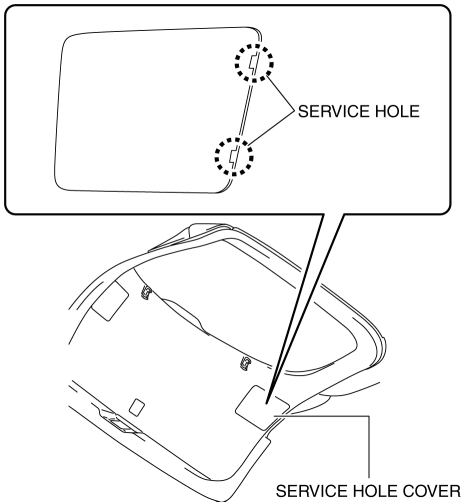
2. Insert a tape-wrapped flathead screwdriver into the service hole in the position shown in the figure.
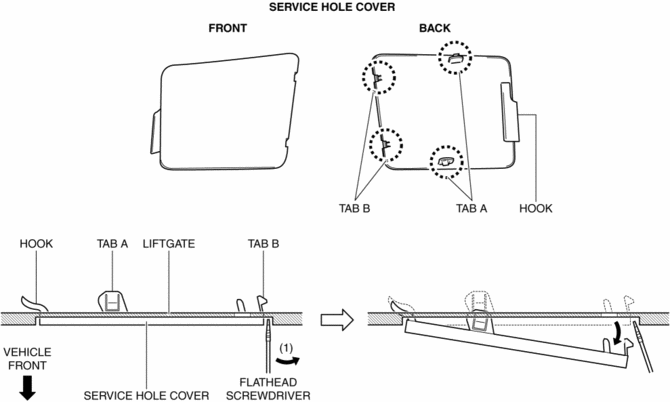
3. Move the flathead screwdriver in the direction of the arrow (1) shown in the figure, pull out the service hole cover from the liftgate, and detach the service hole cover tab and liftgate.
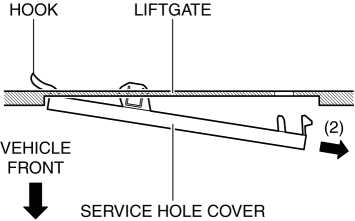
4. Pull out the service hole cover in the direction of the arrow (2) shown in the figure and pull out the service hole cover hook from the liftgate.
5. Remove the service hole cover.
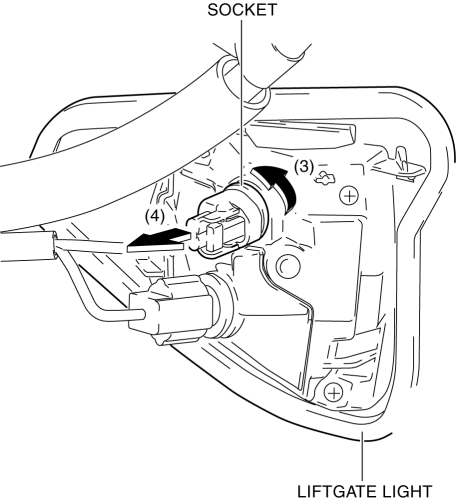
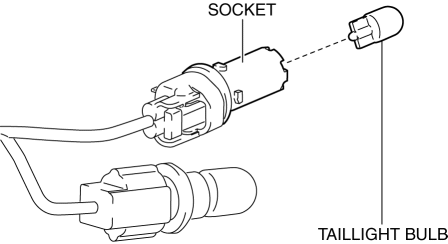
6. Rotate the socket in the direction of the arrow (3) shown in the figure and remove it from the liftgate light in the direction of the arrow (4) shown in the figure.
7. Remove the taillight bulb.
8. Install in the reverse order of removal.
 Rear Side Marker Light Bulb Removal/Installation
1. Disconnect the negative battery cable..
2. Insert a tape-wrapped flathead screwdriver into the service hole in the position
shown in the figure.
3. Move the flathead screwdriver in the di ...
 Turn And Hazard Indicator Alarm
Purpose
The turn and hazard indicator alarm notifies the driver that a turn light
or the hazard warning lights are flashing.
Function
When the instrument cluster receives the tu ...
Other materials:
Cylinder Head
Outline
With the adoption of the rocker arm (built into needle roller bearing), the
sliding resistance has been reduced.
With the adoption of the HLA, the valve clearance is maintained at 0 mm at
all the times.
The contact point of the rocker arm and cam is lubricated by ...
Cooling Fan Relay
Purpose, Function
The cooling fan relay operates by receiving the signal from the PCM to supply
power to the cooling fan motor.
Construction
The cooling fan relay is installed on the relay and fuse block.
Operation
The contact point is on when the battery vo ...
Oil Control Valve (OCV) Removal/Installation
WARNING:
A hot engine can cause severe burns. Turn off the engine and wait until it
is cool before servicing.
1. Disconnect the negative battery cable..
2. Remove the plug hole plate..
3. Remove the ignition coil/ion sensors..
4. Remove the cylinder head cover..
5. Remove in ...
