Mazda CX-5 Service & Repair Manual: Steering Gear And Linkage Inspection
1. Remove the steering gear and linkage..
2. Remove the tie-rod end and boot..
3. Measure the rotation torque of the pinion shaft using a crescent wrench and pull scale. (speed measurement reference 5 В°/s
)
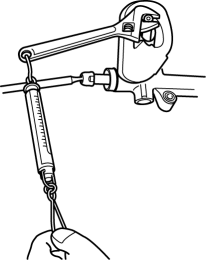
a. Install the crescent wrench to the steering gear.
b. Measure the length from the pinion shaft center to the crescent wrench end (application point of pull scale) as shown in the figure. This is dimension A.

c. The rotation torque of the pinion shaft can be calculated using the following formula Measured value using pull scale (N {kgf, lbf}) = rotation torque of the pinion shaft (NВ·m {kgfВ·cm, inВ·lbf})/length A (m {cm, in})
-
Pinion shaft rotation torque (center of rack В± 180В°)
-
1.0—1.6 N·m {11—16 kgf·cm, 8.9—14 in·lbf} [Pull scale reading: 1.0—1.6 N·m {11—16 kgf·cm, 8.9—14 in·lbf}/A (m {cm, in})]
-
If not within the specification, replace the steering gear..
 Steering Gear And Linkage Disassembly
CAUTION:
To prevent damage to the steering gear, secure it to the vise using a copper
plate or clean cloth.
1. Disassemble in the order indicated in the figure.
1
...
 Steering Gear And Linkage Removal/Installation
CAUTION:
Performing the following procedures without first removing the ABS wheel-speed
sensor may possibly cause an open circuit in the wiring harness if it is pulled
by mistake. Before ...
Other materials:
Catch Tank
Purpose, Function
Suppresses pulsation occurring before evaporative gas is inducted into the
intake manifold.
Construction
The catch tank is installed in the engine compartment.
Operation
When evaporative gas flows from the charcoal canister to the purge sol ...
Oil Pressure Switch Inspection
1. Switch the ignition ON (engine off) and verify that the oil pressure warning
light is illuminated.
2. Start the engine and verify that the oil pressure warning light turns off.
If the oil pressure warning light is not illuminated or remains illuminated,
inspect the wiring harness ...
Air Filter
Purpose
The air filter removes pollen and dust in the intake air and purifies air
flowing into the cabin.
Function
The air filter removes pollen and dust using a dust collecting filter.
Construction
The air filter is installed to the blower unit.
It ...
