Mazda CX-5 Service & Repair Manual: Steering Gear And Linkage Disassembly
CAUTION:
-
To prevent damage to the steering gear, secure it to the vise using a copper plate or clean cloth.
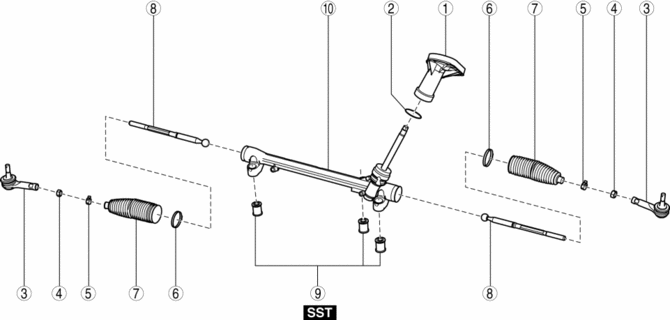
1. Disassemble in the order indicated in the figure.
|
1 |
Dust cover |
|
2 |
O-ring |
|
3 |
Tie-rod end (See Tie-rod End Disassembly Note.) |
|
4 |
Locknut |
|
5 |
Boot clamp |
|
6 |
Boot band (See Boot Band Disassembly Note .) |
|
7 |
Boot |
|
8 |
Tie rod (See Tie Rod Disassembly Note.) |
|
9 |
Mounting rubber (See Mounting Rubber Disassembly Note.) |
|
10 |
Steering gear |
Tie-rod End Disassembly Note
1. Place alignment marks as shown in the figure for proper installation.
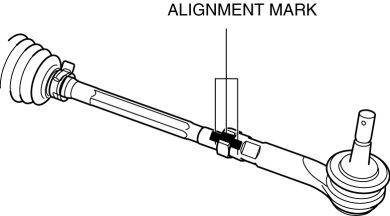
2. Remove the tie-rod end.
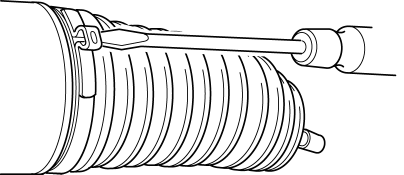
Boot Band Disassembly Note
1. Insert a flathead screwdriver into the boot band as shown in the figure, then press the caulked area outward to remove the boot band.
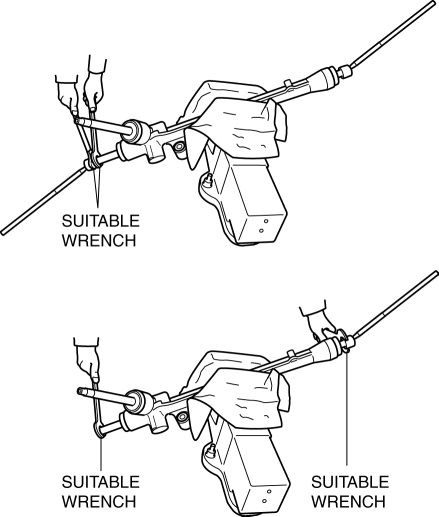
Tie Rod Disassembly Note
1. Lock the steering rack end (pinion gear side) against rotation with a wrench and remove the tie rod using the suitable wrench.
Mounting Rubber Disassembly Note
1. Remove the mounting rubber from the gear housing using the SSTs
and a press.

 Steering Gear And Linkage Assembly
CAUTION:
To prevent damage to the steering gear, secure it to the vise using a copper
plate or clean cloth.
1. Assemble in the order shown in the figure.
1
...
 Steering Gear And Linkage Inspection
1. Remove the steering gear and linkage..
2. Remove the tie-rod end and boot..
3. Measure the rotation torque of the pinion shaft using a crescent wrench and
pull scale. (speed measurement refer ...
Other materials:
General Procedures (Front And Rear Axles)
Wheel and Tire Installation
1. When installing the wheels and tires, tighten the wheel nuts in a criss-cross
pattern to the following tightening torque.
Tightening torque
108—147 N·m {12—14 kgf·m, 80—108 ft·lbf}
Suspension Links Removal/Installation
1. For the joint ...
Low Clutch [Fw6 A EL, Fw6 Ax EL]
Purpose/Function
The low clutch operates in 1GR, 2GR, 3GR and 4GR and intermittently operates
the sun gear by drive force from the turbine shaft.
For the low clutch, a centrifugal balance clutch has been adopted to prevent
clutch drag and to assure stabilized piston thrust in al ...
Refrigerant Charging
CAUTION:
Do not use a different type of refrigerant or charge beyond the specified
level. Otherwise, cooling ability will be lowered and the A/C compressor could
be damaged.
Charging Recycled HFC-134a Refrigerant
1. Connect an HFC-134a recovery/recycling/recharging device to the ...
