Mazda CX-5 Service & Repair Manual: Clutch Pedal Position Switch Removal/Installation [C66 M R]
1. Disconnect the negative battery cable..
2. Disconnect the clutch pedal position switch connector.
3. Rotate the clutch pedal position switch 45° counterclockwise.
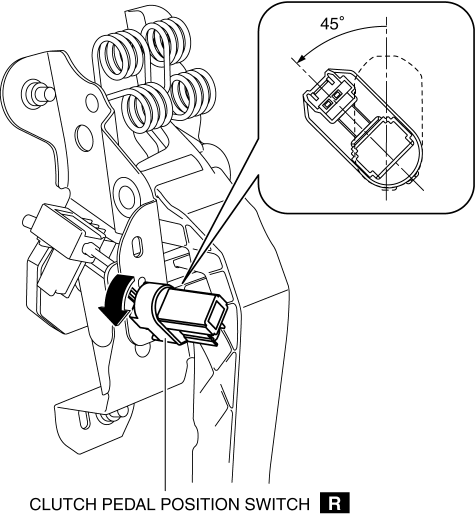
4. Remove the clutch pedal position switch from the clutch pedal.

5. Insert a new clutch pedal position switch into the clutch pedal hole until the switch stops.
6. Rotate the clutch pedal position switch 45° clockwise.
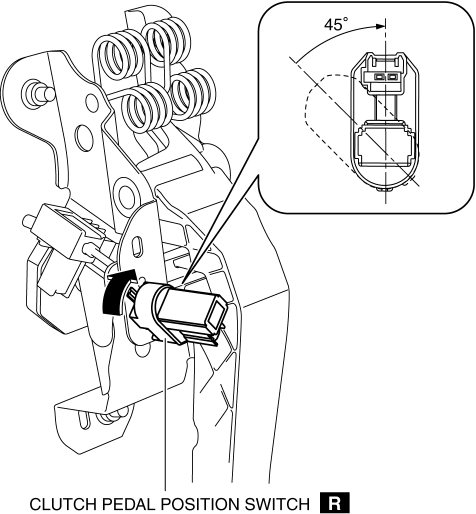
7. Verify that the clutch pedal position switch is locked securely.
8. Install in the reverse order of removal.
 Clutch Pedal Position (CPP) Switch [Skyactiv G 2.0]
Purpose/Function
Detects the connection status of the clutch.
Construction
Installed on the clutch pedal.
An ON/OFF type switch has been adopted.
Operation
...
 Clutch Pedal Removal/Installation [C66 M R]
CAUTION:
Secure the steering wheel using tape or a cable to prevent the steering shaft
from rotating after disconnecting the steering shaft. If the steering wheel
rotates after the steer ...
Other materials:
Starter Inspection [Skyactiv G 2.0]
On-vehicle Inspection
1. Verify that the battery is fully charged.
2. The starter is normal if it rotates smoothly and without any noise when the
engine is cranked.
If the starter does not operate, inspect the following:
Remove the starter, and inspect the starter unit.
...
Customer Assistance (Puerto Rico)
Your complete and permanent satisfaction is our business. That is why all Authorized
Mazda Dealers have the knowledge and the tools to keep your Mazda vehicle in top
condition.
If you have any questions or recommendations for improvement regarding the service
of your Mazda vehicle or servicin ...
DSC HU/CM Removal/Installation
WARNING:
If the DSC HU/CM configuration is not completed, it could result in an unexpected
accident due to the DSC being inoperative. If the DSC HU/CM is replaced, always
use the automatic configuration function so that the DSC operation conditions
are correct.
If the DSC re ...
