Mazda CX-5 Service & Repair Manual: Steering Angle Sensor Inspection
1. Remove the column cover..
2. Connect the plus (+) end of a tester to steering angle sensor terminal A and the minus (-) end of the tester to terminal B (GND).
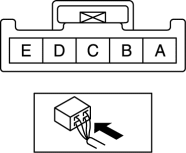
3. Switch the ignition ON (engine off or on).
4. Turn the steering wheel to the left and right.
5. Verify that the voltage from steering angle sensor terminal A to B (GND) is as indicated in the table.
-
If the voltage can be verified as indicated in the table, go to the next step.
-
If the voltage is not as indicated in the table, replace the clock spring..
6. Switch the ignition to off.
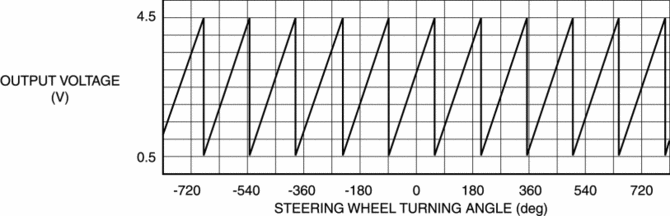
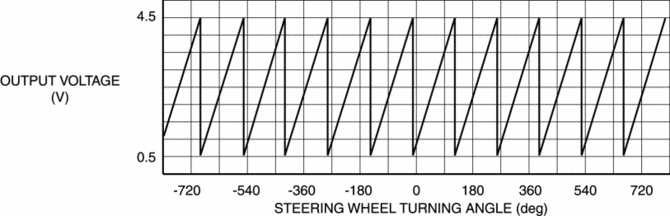
7. Connect the plus (+) end of a tester to steering angle sensor terminal C and the minus (-) end of the tester to terminal B (GND).
8. Switch the ignition ON (engine off or on).
9. Turn the steering wheel to the left and right.
10. Verify that the voltage from steering angle sensor terminal C to B (GND) is as indicated in the table.
-
If the voltage is not as indicated in the table, replace the clock spring..
 Steering Angle Sensor
Purpose, Function
The steering angle sensor outputs the steering angle and steering angle reference
point during the period which the EPS control module performs initial learning
(approx. ...
 Turbine/Input Shaft Speed Sensor, Output Shaft Speed Sensor [Fw6 A EL, Fw6 Ax
EL]
Turbine/Input Shaft Speed Sensor, Output Shaft Speed Sensor [Fw6 A EL, Fw6 Ax
EL]
Purpose/Function
The turbine/input shaft speed sensor detects the rotation speed of the input
shaft (low clutch drum).
The output shaft speed sensor detects the rotation speed of the ...
Other materials:
Steering Gear And Linkage Disassembly
CAUTION:
To prevent damage to the steering gear, secure it to the vise using a copper
plate or clean cloth.
1. Disassemble in the order indicated in the figure.
1
Dust cover
2
O-ring
3
Tie-rod end ...
Front Bumper Disassembly/Assembly
1. Disassemble in the order indicated in the table.
1
Rivet
2
Grille bracket
3
Front bumper retainer
4
Screw
5
Radiator grille
6
O ...
Abbreviations
AAS
Active Adaptive Shift
ABS
Antilock Brake System
ABDC
After Bottom Dead Center
ACC
Accessories
AFS
Adaptive Front Lighting System
ALC
...
