Mazda CX-5 Service & Repair Manual: Rear Center Seat Belt Removal/Installation
CAUTION:
-
The ELR (emergency locking retractor) has a spring that will unwind if the retractor cover is removed. The spring cannot be rewound by hand. If this occurs, the ELR will not work properly. Therefore, do not disassemble the retractor.
1. Press the release switch, then disconnect the rear center seat belt and rear buckle.
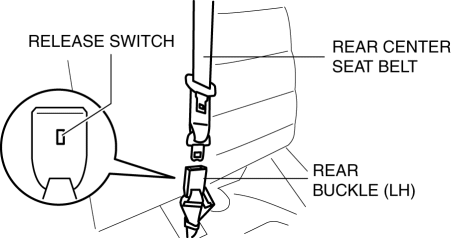
2. Remove the rear center seat belt with the rear seat back..
3. Install in the reverse order of removal..
Rear Center Seat Belt Installation Note
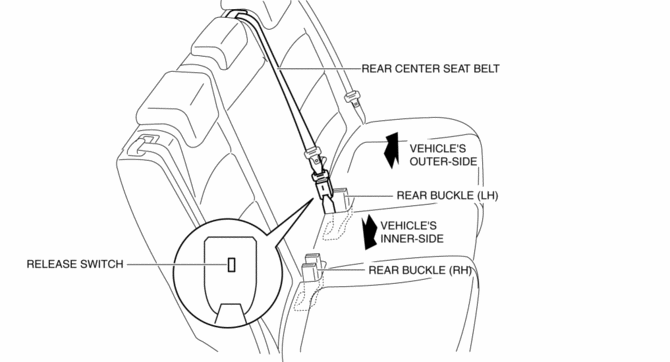
1. After installing the rear center seat belt, place the release switch of the rear buckle so that it faces the vehicle’s inner-side as shown in the figure.
 Drive Belt
Purpose, Function
The drive belt transmits rotation force of the crankshaft pulley to the pulley
for the auxiliary parts.
Construction
The drive belt is installed to the front o ...
 Timing Chain Removal/Installation
WARNING:
A hot engine can cause severe burns. Turn off the engine and wait until it
is cool before servicing.
CAUTION:
If the camshaft is rotated with the timing chain removed ...
Other materials:
Transfer Oil Replacement [Fw6 Ax EL]
1. Remove the front under cover No.2..
2. Remove the drain plug with the washer.
3. Drain the oil into a suitable container.
4. Tighten the drain plug with a new washer.
Tightening torque
40—58 N·m {4.1—5.9 kgf·m, 30—42 ft·lbf}
5. Remove the oil level plug with ...
Front Brake (Disc) Removal/Installation
1. Remove in the order indicated in the table.
2. Install in the reverse order of removal.
3. After installation, add brake fluid, bleed the air, and inspect for fluid
leakage..
4. Depress the brake pedal a few times, rotate the wheel by hand, and verify
that the brake does not drag.
...
Refrigerant Charging
CAUTION:
Do not use a different type of refrigerant or charge beyond the specified
level. Otherwise, cooling ability will be lowered and the A/C compressor could
be damaged.
Charging Recycled HFC-134a Refrigerant
1. Connect an HFC-134a recovery/recycling/recharging device to the ...
