Mazda CX-5 Service & Repair Manual: Seal Plate Removal/Installation
1. Disconnect the negative battery cable..
2. Remove the seal board upper..
3. Remove the front bumper..
4. Remove fasteners A.
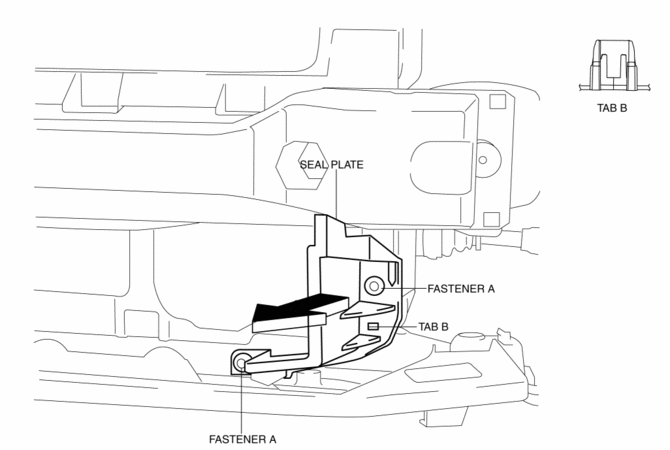
5. Remove the seal plate in the direction of the arrow shown in the figure while detaching tab B.
6. Install in the reverse order of removal.
 Seal Board Upper Removal/Installation
1. Remove fasteners A.
2. Pull the seal board upper in the direction of the arrow in the order of (1),
(2) and remove it while detaching hooks B.
3. Install in the reverse order of removal. ...
 Set Plate Removal/Installation
1. Disconnect the negative battery cable..
2. Remove the seal board upper..
3. Remove the front bumper..
4. Remove fasteners A.
5. Remove the set plate in the direction of the arrow shown ...
Other materials:
Clutch Pedal Position (CPP) Switch [Skyactiv G 2.0]
Purpose/Function
Detects the connection status of the clutch.
Construction
Installed on the clutch pedal.
An ON/OFF type switch has been adopted.
Operation
Inputs the CPP switch on/off signal to the PCM.
The contact point is on and voltage ...
Fuel Injector
Purpose, Function
Promotes atomization of fuel by injecting it from the multiple holes.
Injects fuel according to the control signal from the PCM.
Construction
The fuel injector is installed to the cylinder head.
The fuel injector has multiple injection hole ...
Interior Equipment (View B)
1 Audio control switches
2 SRS air bags
3 Cruise control switches
4 Navigation system (if equipped)
5 Audio system
6 Hazard warning flasher switch
7 Climate control system
8 Glove compartment
9 Rear window defroster switch
10 Accessory socket
11 MT shift lever
12 AT shift lever ...
