Mazda CX-5 Service & Repair Manual: Sail Garnish Removal/Installation
1. Open the front door.
2. Affix protective tape to the position shown in the figure.
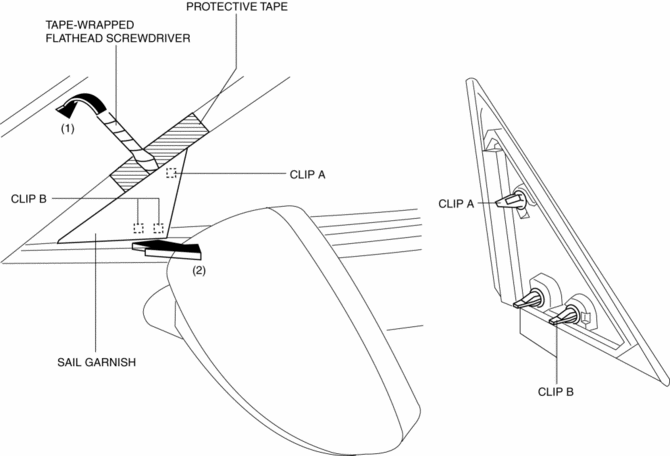
3. Insert a tape-wrapped flathead screwdriver into the shown in the figure and remove the clip A in the direction of arrow (1).
4. Pull the sail garnish in the direction of the arrow (2) and remove it while detaching clips B.
5. Install in the reverse order of removal.
 Repairable Range Of Polypropylene Bumpers [Plastic Body Parts]
The three types of damaged bumpers shown below are considered repairable. Although
a bumper which has been damaged greater than this could also be repaired, it should
be replaced with a new one be ...
 Seal Board Upper Removal/Installation
1. Remove fasteners A.
2. Pull the seal board upper in the direction of the arrow in the order of (1),
(2) and remove it while detaching hooks B.
3. Install in the reverse order of removal. ...
Other materials:
Clutch Fluid Inspection [C66 M R]
NOTE:
A common reserve tank is used for the clutch system and brake system.
1. Verify that the clutch fluid is between the MIN mark and the MAX mark.
Verify that there is no clutch fluid leakage then add clutch fluid to the
level between the MIN mark and the MAX mark..
...
Inspection Of SST (Deployment Tool) [Two Step Deployment Control System]
1. Before using the SST (49 H066 002), inspect its operation.
Inspection Procedure
1. Follow the steps below to inspect the SST (49 H066 002).
If not as indicated in the table, replace the SST (49 H066 002) because
it has a malfunction.
WARNING:
Do not use a malfu ...
Rear Body Control Module (Rbcm)
Outline
Positioned at the rear of the vehicle, the rear body control module (RBCM)
performs numerous system controls for functions at the vehicle rear.
Function
The rear body control module (RBCM) controls the system based on the input/output
signals.
The functions ...
