Mazda CX-5 Service & Repair Manual: Rear Wiper Motor Removal/Installation
1. Disconnect the negative battery cable..
2. Remove the following parts:
a. Rear wiper arm and blade.
b. Liftgate upper trim.
c. Liftgate side trim.
d. Liftgate recess.
e. Liftgate lower trim.
3. Remove the rear wiper motor connector.
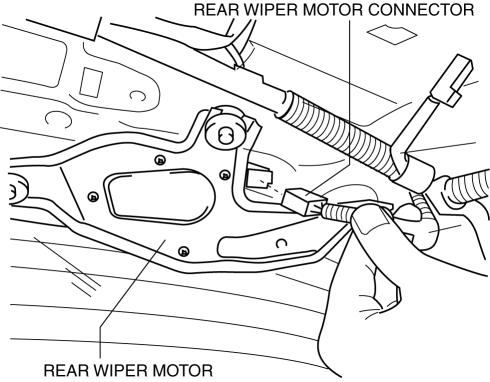
4. Remove bolts shown in the figure.

5. Pull out the rear wiper motor from the outer bushing hole and remove it.
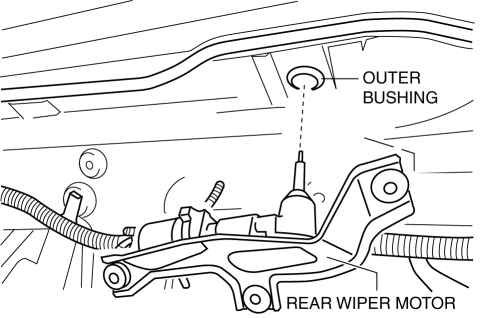
6. Press in the outer bushing from the outside of the liftgate in the direction of the arrow (1) shown in the figure.

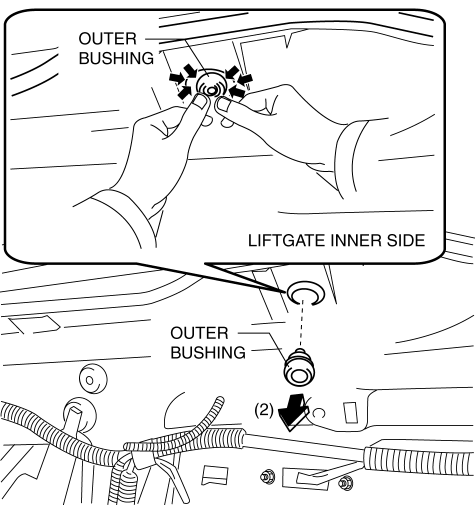
7. Detach the liftgate and outer bushing while pressing the outer bushing in the direction of the arrows shown in the figure, pull the outer bushing from the inside of the liftgate in the direction of the arrow (2), and remove it.
8. Install in the reverse order of removal.
 Rear Wiper Motor Inspection
1. Disconnect the negative battery cable..
2. Open the liftgate.
3. Remove the following parts:
a. Rear wiper arm and blade.
b. Liftgate upper trim.
c. Liftgate side trim.
d. Liftgate rece ...
 Rear Wiper System
Outline
Equipped with continuous, auto-stop, intermittent wiper, and synchronized
washer and wiper operation.
The front body control module (FBCM) performs rear wiper and washer syst ...
Other materials:
Seat Belt Extender
If your seat belt is not long enough, even when fully extended, a seat belt extender
may be available to you at no charge from your Authorized Mazda Dealer.
This extender will be only for you and for the particular vehicle and seat. Even
if it plugs into other seat belts, it may not hold in the ...
Relay And Fuse Block
Purpose
Relays and fuses used by each system are grouped and housed together for
smooth inspection and replacement servicing.
Function
Relays and fuses used by each system are grouped and housed together.
Construction
Installed in the engine compartment.
...
Aerodynamic
Purpose/Function
For improved aerodynamics, under covers are installed to the under-surface
of the vehicle.
Construction
The vehicle is equipped with the following (3) under covers.
Front under cover No.1
Front under cover No.2
Floor under co ...
