
Mazda CX-5 Service & Repair Manual: Liftgate Opener Switch Inspection
1. Disconnect the negative battery cable..
2. Remove the following parts:
a. Liftgate upper trim.
b. Liftgate side trim.
c. Liftgate lower trim.
d. Liftgate garnish.
e. Liftgate opener switch.
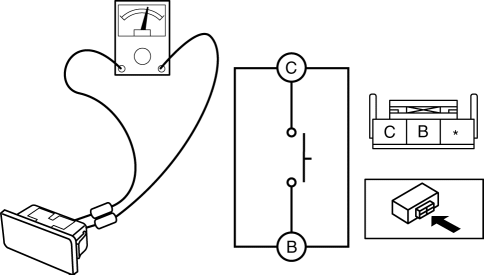
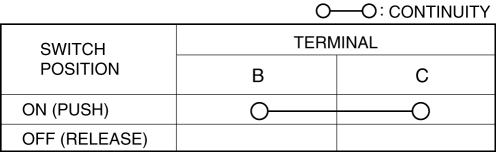
3. Verify the continuity of liftgate opener switch terminals B and C.
-
If not as indicated in the table, replace the liftgate opener switch.
 Liftgate Lower Trim Removal/Installation
1. Remove the following parts:
a. Liftgate upper trim.
b. Liftgate side trim.
c. Liftgate recess.
2. Remove fasteners A.
3. Take the shaded area shown in the figure, and pull the liftgat ...
 Liftgate Opener Switch Removal/Installation
1. Disconnect the negative battery cable..
2. Remove the following parts:
a. Liftgate upper trim.
b. Liftgate side trim.
c. Liftgate lower trim.
d. Liftgate garnish.
3. Remove the liftgate ...
Other materials:
Shroud Side Member Removal [Panel Replacement]
Symbol Mark
Removal Procedure
1. Drill the 3 locations indicated by (A) shown in the figure.
2. Drill the 8 locations indicated by (B) and 2 locations indicated by (C) shown
in the figure.
NOTE:
When drilling the 3 locations indicated by (A) and 2 locations indicated
by (C) sh ...
Air Mix Actuator [Full Auto Air Conditioner]
Purpose
The air mix actuator moves the air mix door in the A/C unit to adjust the
temperature of the air blown from the air vent.
Function
Door open/close function
The air mix actuator drives the motor based on the signals from the climate
control unit and moves the air mi ...
Refrigerant System Service Warnings
Handling Refrigerant
Avoid breathing air conditioning refrigerant or lubricant vapor. Exposure
may irritate eyes, nose and throat. Also, due to environmental concerns, we
urge use of recovery/recycling/recharging equipment when draining HFC-134a from
the air conditioning system. If a ...
