Mazda CX-5 Service & Repair Manual: Rear Wiper Arm And Blade Adjustment
1. Switch the ignition ON (engine off or on).
2. Operate the rear wiper.
3. Verify that the rear wiper is operating and stop the rear wiper.
4. Verify that the rear wiper is stopped at the auto-stop position.
5. Remove the rear wiper arm and blade..
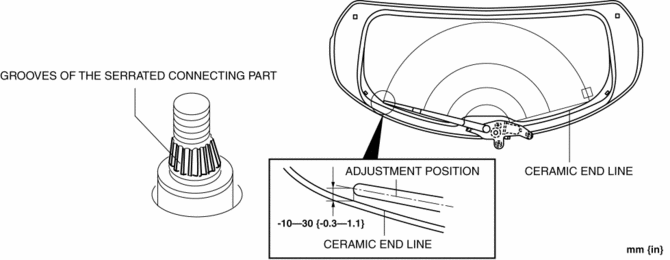
6. Install the rear wiper arm to the serrated connecting part, adjust the rear wiper blade end to the area shown in the figure while sliding the rear wiper arm onto the grooves of the serrated connecting part one by one, and temporarily tighten the nut.
NOTE:
-
If the rear wiper arm and blade is not installed to the position shown in the figure, repeat the adjustment procedure.

7. After adjusting the rear wiper arm and blade, tighten the nut completely..
 Auto Wiper System
Outline
The auto wiper system detects the amount of rainfall on the windshield and
automatically operates the windshield wipers intermittently or at low/high speed
and stops. Using the se ...
 Rear Wiper Arm And Blade Removal/Installation
Rear Wiper Arm
1. Pull the cap in the direction of the arrows (1) shown in the figure and remove
it in the direction of the arrow (2) with tabs A, B released.
2. Remove the nut with the rear ...
Other materials:
Front Body Control Module (Fbcm) Configuration (Using Read/Write Function)
NOTE:
When performing configuration, it is necessary to read the vehicle specification
information from the front body control module (FBCM) before replacing it. Connect
the M-MDS to the vehicle and perform vehicle identification before removing
the front body control module (FBCM). ...
DSC Related Parts Sensor Initialization Procedure
WARNING:
If the initialization procedure is not completed, the DSC will not operate
properly and it might cause an unexpected accident. Therefore, after replacing
or removing the DSC HU/CM or SAS control module, make sure to perform the initialization
procedure to insure proper DSC ...
Rear Console Disassembly/Assembly
1. Disassemble in the order indicated in the table.
1
Screw A
2
Rear console bracket
3
Screw B
4
Side panel
5
Rear console box
6
U ...
