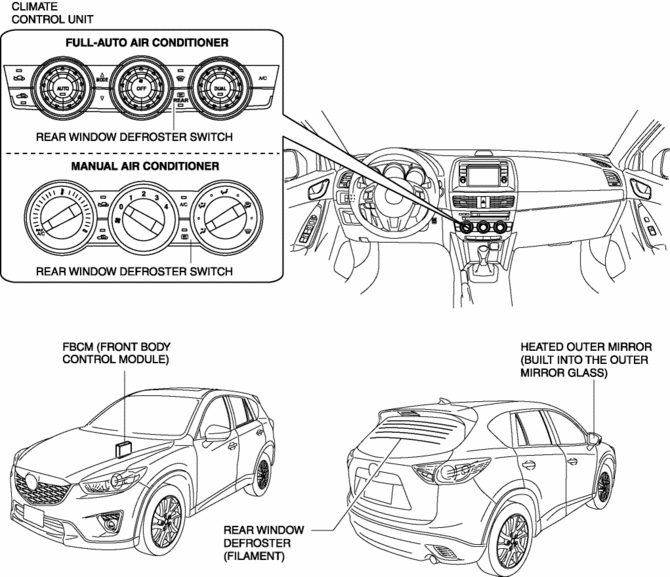
Mazda CX-5 Service & Repair Manual: Rear Window Defroster/Outer Mirror Heater
Outline
-
Fogging is cleared from the rear window and outer mirror glass by heating of the filament.
Structural view
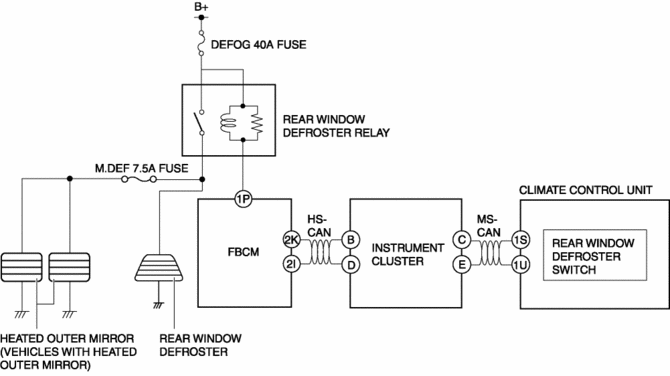
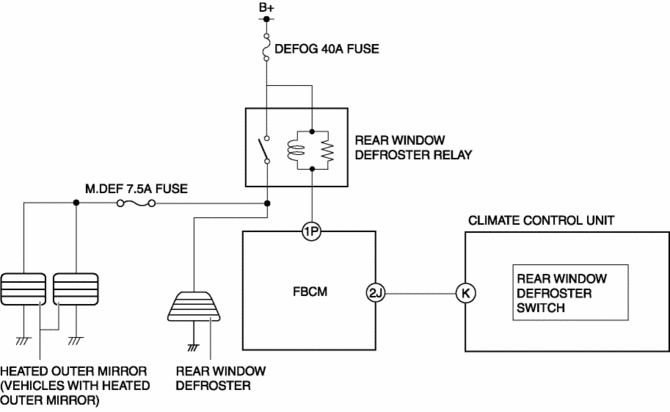
System wiring diagram
Vehicles with full-auto air conditioner system
Vehicles with manual air conditioner system
Construction
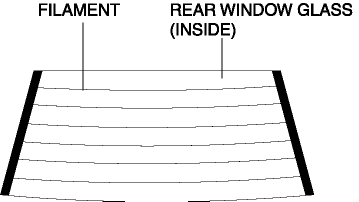
Rear window defroster
-
The rear window defroster filament is inside the rear window glass.
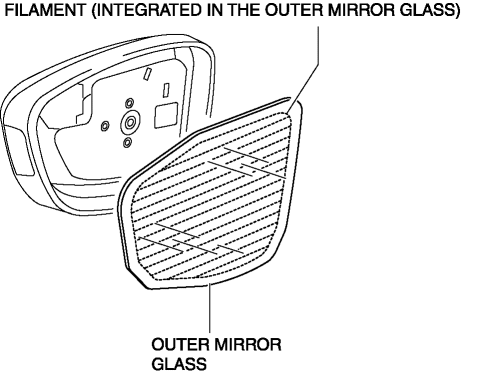
Heated outer mirror
-
The heated outer mirror filament is integrated in the outer mirror glass.
Operation
Vehicles with full-auto air conditioner system
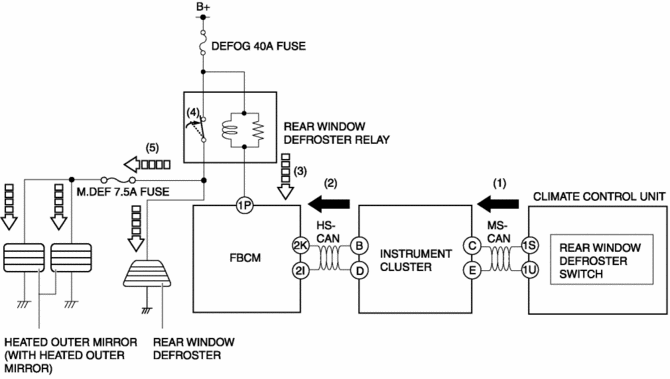
1. When the rear window defroster switch on the climate control unit is turned on (1), an ON/OFF control request signal is sent to the front body control module (FBCM) through the instrument cluster as a CAN signal.(2)
2. When the front body control module (FBCM) receives the ON/OFF control request signal, it supplies the battery voltage to the rear window defroster relay.(3)
3. When the battery voltage is supplied to the rear window defroster relay, a switch inside the rear window defroster relay is turned on.(4)
4. When the switch inside the rear window defroster relay is turned on, the battery voltage is supplied to the rear window defroster/heated outer mirrors to operate them.(5)
-
When approx. 15 min.
has elapsed after the rear window defroster switch was turned on, the timer control of the front body control module (FBCM) turns off the rear window defroster relay automatically to turn off the rear window defroster/heated outer mirror.
-
When the rear window defroster switch is pressed while the rear window defroster/heated outer mirrors are operating, they stop operating.
Vehicles with manual air conditioner system
1. When the rear window defroster switch on the climate control unit is turned on (1), a signal is sent from the climate control unit to the front body control module (FBCM) and the battery voltage is supplied to the rear window defroster relay.(2)
2. When the battery voltage is supplied to the rear window defroster relay, a switch inside the rear window defroster relay is turned on.(3)
3. When the switch inside the rear window defroster relay is turned on, the battery voltage is supplied to the rear window defroster/heated outer mirrors to operate them.(4)

-
When approx. 15 min.
has elapsed after the rear window defroster switch was turned on, the timer control of the front body control module (FBCM) turns off the rear window defroster relay automatically to turn off the rear window defroster/heated outer mirror.
-
When the rear window defroster switch is pressed while the rear window defroster/heated outer mirrors are operating, they stop operating.
Fail-safe
-
Function not equipped
 Rear Heat Duct Removal/Installation
1. Disconnect the negative battery cable..
2. Remove the following parts:
a. Decoration panel.
b. Shift lever knob (MTX).
c. Front console box.
d. Shift panel.
e. Upper panel.
f. Rear co ...
 A/C
A/C
...
Other materials:
Auto Dimming Mirror Removal/Installation
1. Disconnect the negative battery cable..
2. Remove the screw B.
3. Remove the auto-dimming mirror in the direction of arrow (1) shown in the
figure.
4. Detach tabs while push the cover No.2 in the direction of the arrow (2) shown
in the figure, then remove the cover No.2 in the d ...
Filament Inspection
1. Switch the ignition ON (engine off).
2. Turn the rear window defroster switch on.
CAUTION:
Directly touching the rear window defroster filament with the lead of the
tester could damage it. Wrap aluminum foil around the end of the lead and inspect
the filament by touching it ...
Tire Labeling
Federal law requires tire manufacturers to place standardized information on
the sidewall of all tires. This information identifies and describes the fundamental
characteristics of the tire and also provides a tire identification number for safety
standard certification and in case of a recall ...
