Mazda CX-5 Service & Repair Manual: Front Door Latch Switch Inspection
1. Perform the front door glass preparation..
2. Disconnect the negative battery cable..
3. Remove the following parts:
a. Inner garnish.
b. Front door trim.
c. Front door glass.
d. Front door module panel.
e. Front door key cylinder.
f. Front door latch and lock actuator.
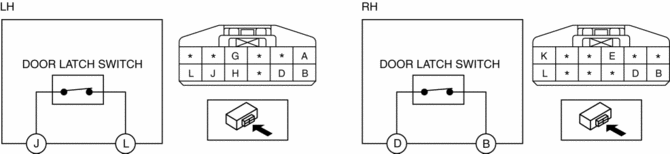
4. Verify that the continuity is as indicated in the table.

-
If not as indicated in the table, replace the front door latch and lock actuator.
NOTE:
-
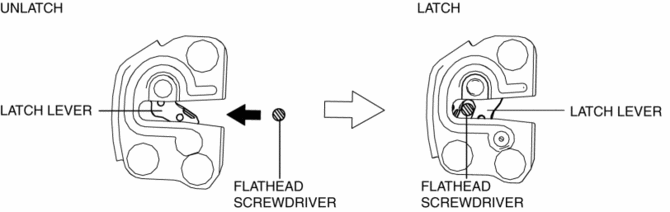
When inspecting the latch side of the front door latch switch, press in the latch lever using a flathead screwdriver and set it to the latched position.
 Front Door Latch Switch
Purpose, Function
Switches on/off in conjunction with the latch lever rotation, and detects
the front door open/closed condition by the voltage which is changed by the
rear body control m ...
 Front Door Module Panel Removal/Installation
1. Perform the front door glass preparation..
2. Disconnect the negative battery cable..
3. Remove the following parts:
a. Inner garnish.
b. Front door trim.
c. Front door speaker.
d. Fron ...
Other materials:
Evaporator Temperature Sensor Inspection [Full Auto Air Conditioner]
NOTE:
Inspect the evaporator temperature sensor when it is installed to the A/C
unit.
1. Set the fan speed at MAX HI.
2. Set the temperature control at MAX COLD.
3. Set the RECIRCULATE mode.
4. Turn the A/C switch off.
5. Close all doors and windows.
6. Wait for 5 min.
7 ...
Mirror Base Installation
1. Cut away all of the original sealant using a razor.
WARNING:
Using a razor with bare hands can cause injury. Always wear gloves when using
a razor.
2. Clean and degrease the ceramic coating on the glass and the base.
CAUTION:
Keep the area free of dirt and grease, and ...
Rear Seat Cushion Trim Removal/Installation
CAUTION:
When removing or putting in the rear seat cushion, contact with the surrounding
areas of the vehicle could cause scratches and damage. When removing or putting
in the rear seat cushion, always use two or more persons to perform the work
and be careful not to scratch or dama ...
