Mazda CX-5 Service & Repair Manual: Rear Mount Camera Inspection
1. Disconnect the negative battery cable..
2. Remove the following parts:
a. Liftgate upper trim.
b. Liftgate side trim.
c. Liftgate lower trim.
d. Liftgate garnish.
e. Rear mount camera.
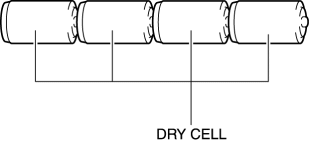
3. Prepare four dry cell batteries (1.5 V)
4. Connect the four dry cell batteries in a series.
5. Connect the positive pole of the dry cell battery to rear mount camera terminal A, and the negative pole to terminal D.
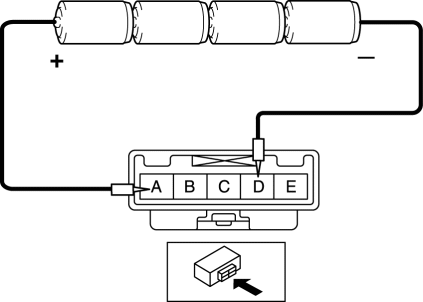
6. With the cell batteries being connected, measure the waveform between rear mount camera terminal C and body ground.
7. Verify that the waveform is displayed as shown in the figure.
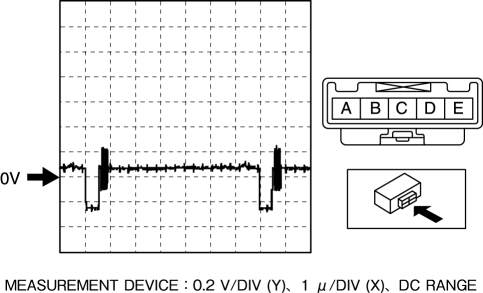
8. If the voltage is not as shown in the figure, replace the rear mount camera.
 Rear Mount Camera
Purpose, Function
The rear mount camera shoots the conditions at the rear of the vehicle in
color, and after converting the video signal, it outputs the signal to the audio
unit. (with co ...
 Rear Mount Camera Removal/Installation
CAUTION:
The audio unit communicates with the rear mount camera and records the presence/non-presence
of the rear mount camera when the ignition is switched to ACC or ON (engine
off or o ...
Other materials:
Exhaust System Removal/Installation
WARNING:
A hot engine and exhaust system can cause severe burns. Turn off the engine
and wait until they are cool before removing the exhaust system.
2WD
1. Disconnect the negative battery cable..
2. Remove in the order indicated in the table.
3. Remove the insulator..
4. Ins ...
Ignition Coil [Skyactiv G 2.0]
Purpose, Function
The ignition coil generates high voltage by electromagnetic induction to
discharge the spark plug.
Construction
The ignition coil is installed to the upper part of the spark plug (direct
ignition coil).
With the adoption of the direct ignitio ...
Rear Seat Belt Removal/Installation
CAUTION:
The ELR (emergency locking retractor) has a spring that will unwind if the
retractor cover is removed. The spring cannot be rewound by hand. If this occurs,
the ELR will not work properly. Therefore, do not disassemble the retractor.
1. Remove the following parts:
a. T ...
