Mazda CX-5 Service & Repair Manual: Rear Drive Shaft Inspection
1. Inspect each connecting part for looseness.
-
Tighten or replace parts if necessary.
2. Inspect the dust boot on the drive shaft for cracks, damage, leaking grease, and looseness in the boot band.
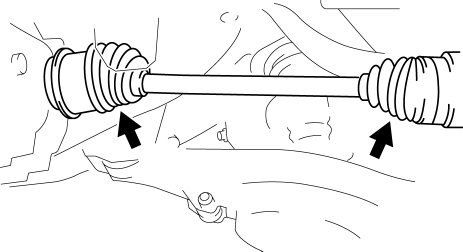
3. Inspect the drive shaft for bends, cracks, and wear in the joints or splines.
-
Repair or replace the drive shaft or boot band if necessary.
 Rear Drive Shaft Disassembly/Assembly
1. Disassemble in the order indicated in the table.
2. Assemble in the reverse order of disassembly.
1
Boot band (differential side)
(See Boot Band (Differential Sid ...
 Rear Drive Shaft Removal/Installation
CAUTION:
Performing the following procedures without first removing the ABS wheel?speed
sensor may possibly cause an open circuit in the harness if it is pulled by
mistake. Before perf ...
Other materials:
Storage Compartments
WARNING
Keep storage boxes closed when driving:
Driving with the storage boxes open is dangerous. To reduce the possibility of
injury in an accident or a sudden stop, keep the storage boxes closed when driving.
CAUTION
Do not leave lighters or eyeglasses in the storage boxes while parked under ...
Rear Differential Assembly
WARNING:
The engine stand is equipped with a self-lock mechanism, however, if the
rear differential is in a tilted condition, the self-lock mechanism could become
inoperative. If the rear differential unexpectedly rotates it could cause injury,
therefore do not maintain the rear dif ...
AUX/USB/iPod mode
Audio can be heard from the vehicle's speakers by connecting a commercially available
portable audio unit to the auxiliary jack.
A commercially-available, non-impedance (3.5 ) stereo mini plug cable is required.
Contact an Authorized Mazda Dealer for details.
In addition, audio can be playe ...
