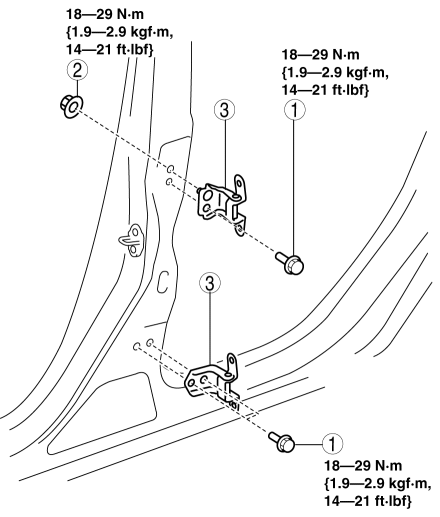
Mazda CX-5 Service & Repair Manual: Rear Door Hinge Removal/Installation
1. Disconnect the negative battery cable..
2. Remove the following parts:
a. Rear door.
b. Front scuff plate.
c. Rear scuff plate.
d. B-pillar lower trim.
3. Remove in the order shown in the figure.
|
1 |
Bolt |
|
2 |
Nut |
|
3 |
Rear door hinge |
4. Install in the reverse order of removal.
 Rear Door Garnish Removal/Installation
WARNING:
Using a utility knife with bare hands can cause injury. Always wear gloves
when using a utility knife.
Front
1. Using a tape-wrapped fastener remover, remove clips A in the ...
 Rear Door Latch And Lock Actuator Inspection
The following actuator and switch are integrated with the rear door latch
and lock actuator.
From the actuator/switch name and operation in the following table, select
the actu ...
Other materials:
Charcoal Canister Inspection
U.S.A. And CANADA
Leakage inspection
1. Perform the following procedures:
Do not operate CV solenoid valve.
Assemble the hose used for inspection to port A.
Cover ports B and C with the caps.
CAUTION:
Do not apply a pressure 20 kPa {150 mmHg, 5.91 inHg} o ...
Turbine/Input Shaft Speed Sensor, Output Shaft Speed Sensor [Fw6 A EL, Fw6 Ax
EL]
Purpose/Function
The turbine/input shaft speed sensor detects the rotation speed of the input
shaft (low clutch drum).
The output shaft speed sensor detects the rotation speed of the output shaft
(primary gear).
The turbine/input shaft speed sensor and output shaft speed ...
Lap Pre Tensioner Seat Belt [Two Step Deployment Control System]
Purpose
The lap pre-tensioner seat belts retract and tighten the seat belt webbing
to protect the front passengers during a collision.
Function
The lap pre-tensioner seat belts operate (deploy) based on the operation
signal from the SAS control module to instantly retract a ...
