Mazda CX-5 Service & Repair Manual: Audio Pilot®2 Microphone Removal/Installation
NOTE:
-
AudioPilot®2 is a registered trademark of Bose® Corporation.
1. Disconnect the negative battery cable..
2. Remove the following parts:
a. Driver-side front scuff plate.
b. Driver-side front side trim.
c. Switch panel.
d. Decoration panel.
e. Shift lever knob (MTX).
f. Front console box.
g. Shift panel.
h. Upper panel.
i. Rear console.
j. Side wall.
k. Front console.
l. Hood release lever.
m. Driver-side lower panel.
3. Disconnect the connector.
4. Remove the nut.
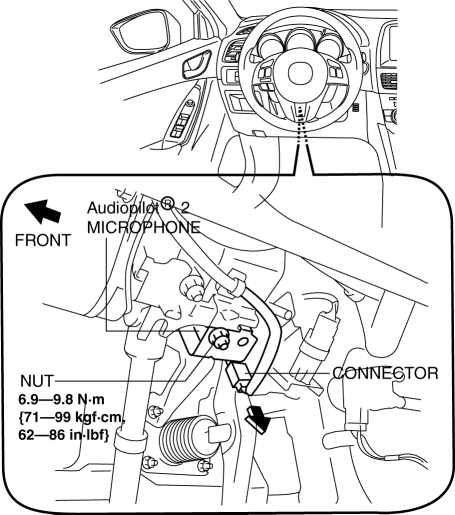
5. Remove the AudioPilot®2 microphone.
6. Install in the reverse order of removal.
 Audio Amplifier Removal/Installation
1. Disconnect the negative battery cable..
2. Remove the following parts:
a. Front scuff plate (RH).
b. Front side trim (RH).
3. Remove the bolts.
4. Lift up the audio amplifier in the d ...
 Audio System
NOTE:
“iPod” is a registered trademark of Apple Inc. in the United States and other
countries.
Outline
An audio unit compatible with AM/FM tuner and MP3/WMA (Windows Media ...
Other materials:
Fully Automatic Type
Climate control information is displayed on the display.
Control Switches
AUTO switch
By pressing the AUTO switch the following functions will be automatically controlled
in accordance with the selected set temperature:
• Airflow temperature
• Amount of airflow
• Selection of airflow ...
Fuel Injection Control System
Outline
Performs optimum fuel injection according to engine operation conditions.
The PCM determines the engine operation conditions based on the signals from
each input device and drives the fuel injectors at the optimal fuel injection
time (fuel injection amount) and the fuel ...
On Board Diagnostic System Simulation Inspection [Fw6 A EL, Fw6 Ax EL]
1. Connect the M-MDS to the DLC-2.
2. After the vehicle is identified, select the following items from the initialization
screen of the M-MDS.
a. Select “DataLogger”.
b. Select “Modules”.
c. Select “TCM”.
3. Select the simulation items from the PID table.
4. Perform the act ...
