Mazda CX-5 Service & Repair Manual: Clutch Cover Inspection [C66 M R]
1. Remove the clutch cover..
2. Perform the following procedures to inspect the clutch cover.
-
If it exceeds the maximum specification, replace the clutch cover..
a. Measure the wear of the diaphragm spring fingers.

-
Clutch cover diaphragm spring fingers maximum depth
-
0.6 mm {0.02 in}
b. Measure the flatness of the pressure plate with a straight edge and a feeler gauge.
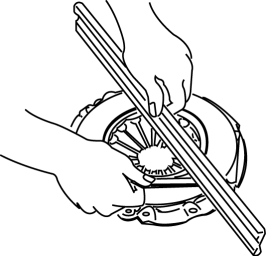
-
Maximum clearance of flatness of the pressure plate
-
0.3 mm {0.01 in}
c. Inspect the diaphragm spring fingers for the degree of uniformity in their height.
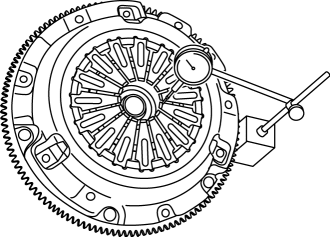
i. Install the clutch cover..
ii. When checking the diaphragm spring fingers, mount a dial gauge on the cylinder block.
iii. Rotate the flywheel and check for misaligned diaphragm spring fingers.
-
Clutch cover diaphragm spring fingers maximum height difference
-
1.0 mm {0.039 in}
 Turbine/Input Shaft Speed Sensor, Output Shaft Speed Sensor [Fw6 A EL, Fw6 Ax
EL]
Turbine/Input Shaft Speed Sensor, Output Shaft Speed Sensor [Fw6 A EL, Fw6 Ax
EL]
Purpose/Function
The turbine/input shaft speed sensor detects the rotation speed of the input
shaft (low clutch drum).
The output shaft speed sensor detects the rotation speed of the ...
 Clutch Disc Inspection [C66 M R]
Operation Inspection
1. Inspect the lining surface for discoloration and grease adhesion.
2. Inspect the torsion spring for weakness and the rivets for looseness.
3. Using a vernier caliper, meas ...
Other materials:
Automatic Transaxle Fluid (ATF) Replacement [Fw6 A EL, Fw6 Ax EL]
WARNING:
Do not perform the servicing while the ATF is hot. Otherwise, it could cause
severe burns or serious injury.
1. Remove the front under cover No.2..
2. Remove the dipstick securing bolt.
3. Remove the dipstick.
4. Remove the drain plug and washer, and drain the ATF ...
Magnet Clutch [Full Auto Air Conditioner]
Purpose
The magnetic clutch transmits the rotation force from the engine to the shaft
in the A/C compressor.
Function
The magnetic clutch engages or disengages the magnetic clutch and the A/C
turns on or off by switching the power transmission from the engine.
C ...
Power Steering Malfunction Indicator Light
Purpose
The power steering malfunction indicator light warns the driver that there
is a malfunction with the electric power steering (EPS) system.
Function
If there is a malfunction in the EPS system, the power steering malfunction
indicator light illuminates.
If th ...
