Mazda CX-5 Service & Repair Manual: Pressure Sensor Removal/Installation [Two Step Deployment Control System]
WARNING:
-
Handling the pressure sensor improperly can accidentally operate (deploy) the air bag module, which may seriously injure you. Read the air bag system service warnings and cautions before handling the pressure sensor..
1. Switch the ignition to off.
2. Disconnect the negative battery cable and wait for 1 min or more
..
3. Remove the inner garnish..
4. Remove the front door trim..
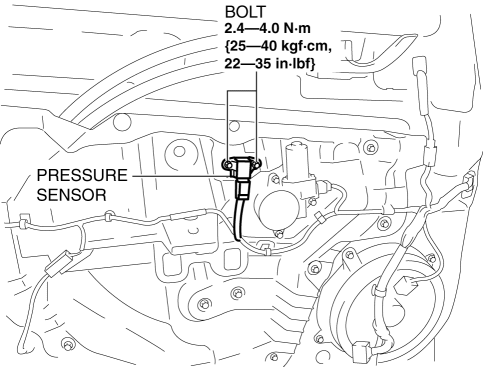
5. Remove the bolts.

6. Remove the pressure sensor.
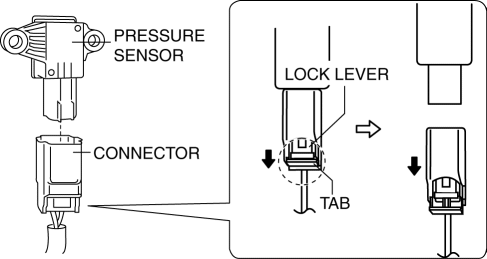
7. Disconnect the connector from the pressure sensor by pressing the connector tab and pulling out the lock lever in the direction of the arrow.

-
When connecting the pressure sensor connector, insert the lock lever (connector disconnection prevention lever) completely.
8. Install in the reverse order of removal.
9. Switch the ignition ON (engine off or on).
10. Verify that the air bag system warning light illuminates for approx. 6 s
and goes out.
-
If the air bag system warning light does not operate normally, refer to the on-board diagnostic system (air bag system) and perform inspection of the system..
 Brake Fluid Pressure Sensor Inspection
1. Switch the ignition to off.
2. Remove the clips.
3. Set the splash shield out of the way.
4. Disconnect the brake pipe from the LF brake hose.
5. Remove the clip.
6. Remove the LF ...
 Pressure Sensor [Two Step Deployment Control System]
Purpose
The pressure sensor determines at an earlier stage whether to detonate the
air bag on the side of the vehicle (around front door) receiving an impact.
This is for improved accurac ...
Other materials:
Main Fuse
Purpose
If electric current of the specified value or more flows to each fuse, the
fuse melts due to heat generation to protect the systems and parts downstream
of the fuse.
Function
If electric current to each fuse is the specified value or more, the fuse
melts due to h ...
Taillight Bulb Removal/Installation
1. Disconnect the negative battery cable..
2. Insert a tape-wrapped flathead screwdriver into the service hole in the position
shown in the figure.
3. Move the flathead screwdriver in the direction of the arrow (1) shown in the
figure, pull out the service hole cover from the liftgate, a ...
Discharge Headlight Control Module
Purpose
Converts DC voltage from the battery to AC voltage and outputs the stabilized
voltage to the discharge headlight.
Function
The discharge headlight control module controls the voltage from the battery
to illuminate the discharge headlight.
The discharge headl ...
