Mazda CX-5 Service & Repair Manual: Pre Tensioner Seat Belt [Two Step Deployment Control System]
Purpose
-
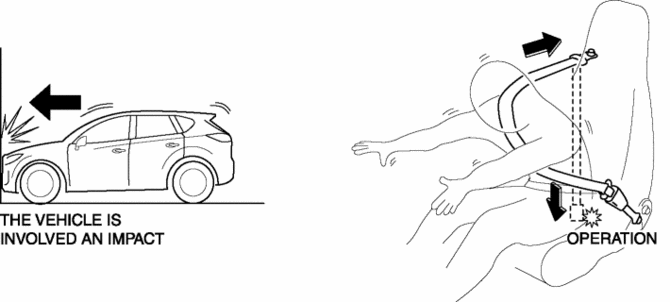
The pre-tensioner seat belt retracts and tightens the seat belt webbing to protect the front passengers during a collision.
Function
-
The pre-tensioner seat belts operate (deploy) based on the operation signal from the SAS control module to instantly retract and tighten the belt webbing, restraining the driver and front passenger.
Construction
-
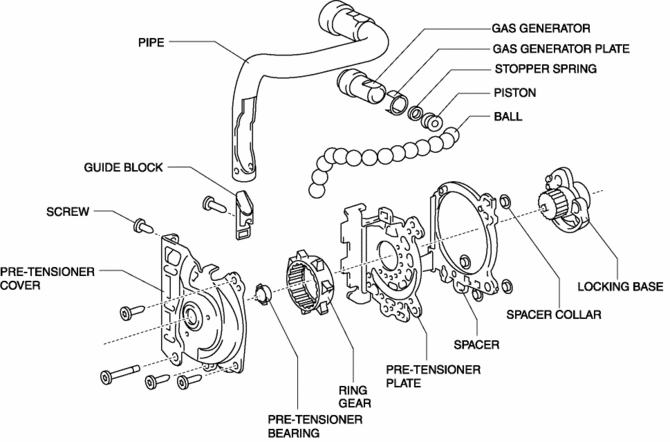
The pre-tensioner seat belt is installed to the front seat belt retractor.
-
The pre-tensioner seat belt consists of the following parts shown in the figure:
Operation
Normal operation (pre-tensioner non-operation)
-
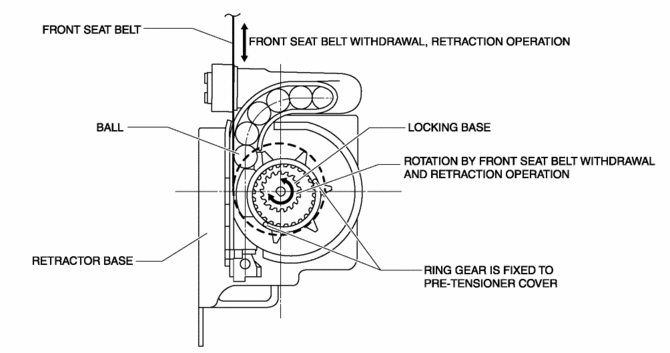
Normally, there is a gap between the locking base and the ring gear.
-
The ring gear rotates in conjunction with the withdrawal and retraction of the front seat belts, however, in the pre-tensioner part it is kept separated.
Pre-tensioner activation
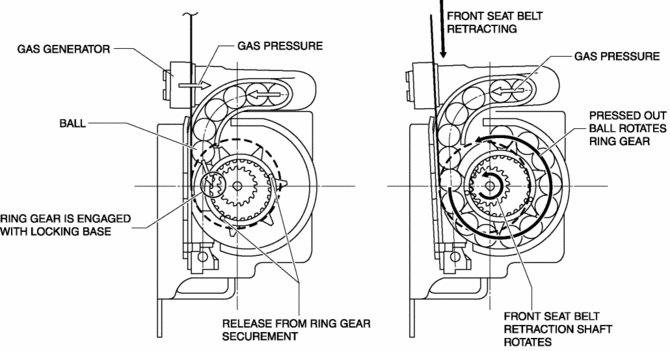
1. The gas generator produces gas when it receives an operation signal from the SAS control module.
2. The ball in the cylinder is pressed by the gas pressure and the ring gear is removed from its securement.
3. The ring gear is engaged with the locking base and the force of the ball being pressed out is transmitted to the retraction shaft.
4. The front seat belt is retracted in conjunction with the rotation of the retraction shaft.
Fail-safe
-
Function not equipped.
 Pre Tensioner Seat Belt [Standard Deployment Control System]
Purpose
The pre-tensioner seat belt retracts and tightens the seat belt webbing to
protect the front passengers during a collision.
Function
The pre-tensioner seat belts operate ...
 Pressure Sensor Removal/Installation [Two Step Deployment Control System]
WARNING:
Handling the pressure sensor improperly can accidentally operate (deploy)
the air bag module, which may seriously injure you. Read the air bag system
service warnings and cautio ...
Other materials:
Fuel and Engine Exhaust Precautions
Fuel Requirements
Vehicles with catalytic converters or oxygen sensors must use ONLY UNLEADED FUEL,
which will reduce exhaust emissions and keep spark plug fouling to a minimum.
Your Mazda will perform best with fuel listed in the table.
Fuel with a rating lower than 87 octane (91 RON) could ...
Rear Brake (Disc) Removal/Installation
1. Loosen the adjusting nut..
2. Remove in the order indicated in the table.
3. Install in the reverse order of removal.
4. After installation, add brake fluid, bleed the air, and inspect for fluid
leakage..
5. Pump the brake pedal a few times and inspect the following:
The disc pa ...
Audio Control Switch Operation
When the audio unit is turned on, operation of the audio unit from the steering
wheel is possible.
NOTE
Because the audio unit will be turned off under the following conditions,
the switches will be inoperable.
• When the ignition is switched off.
• When the power button on the audio uni ...
