Mazda CX-5 Service & Repair Manual: Passenger Side Air Bag Module Removal/Installation [Standard Deployment Control System]
WARNING:
-
Handling the air bag module improperly can accidentally deploy the air bag module, which may seriously injure you. Read the air bag system service warnings and cautions before handling the air bag module..
NOTE:
-
When replacing the passenger-side air bag module after the deployment, replace it together with the mid-wiring harness.
-
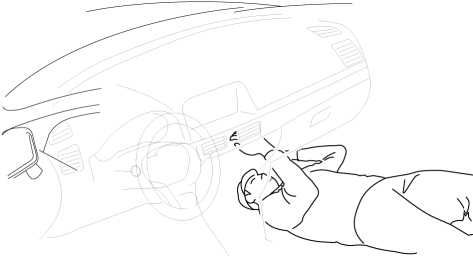
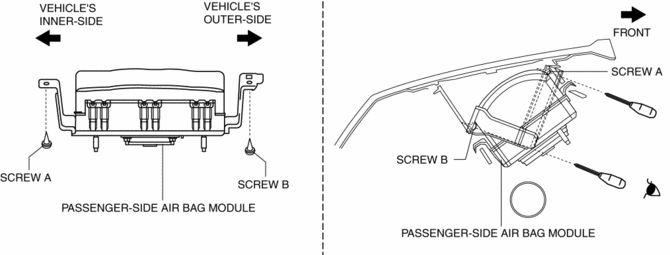
When removing the passenger-side air bag module, perform the procedure in the posture shown in the figure.
1. Switch the ignition to off.
2. Disconnect the negative battery cable and wait for 1 min or more
..
3. Remove the following parts:
a. Front scuff plate (passenger-side).
b. Front side trim (passenger-side).
c. Glove compartment.
d. Decoration panel.
e. Dashboard under cover.
f. Lower panel (passenger-side).
g. Front heat duct (passenger-side).
h. Blower unit.
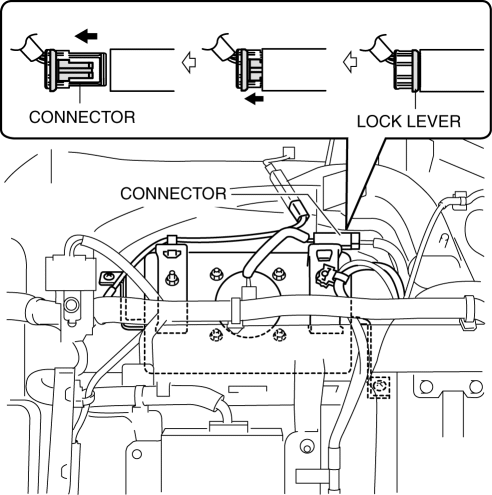
4. Disconnect the connector.
5. Remove clips A.
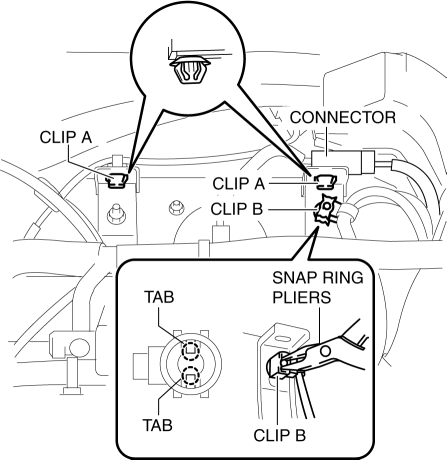
6. Remove clip B while opening the tabs outward using snap ring pliers.
7. Remove the nuts.
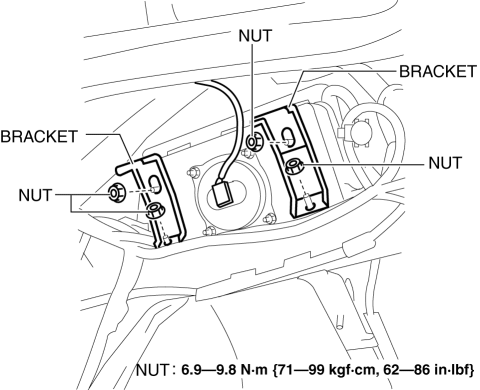
8. Remove the bracket.
9. Remove screws A and B while visually verifying the screw positions..
10. Pull the passenger-side air bag module in the direction of the arrow (2) and remove hooks A from the dashboard while spreading the dashboard in the direction of the arrow (1).
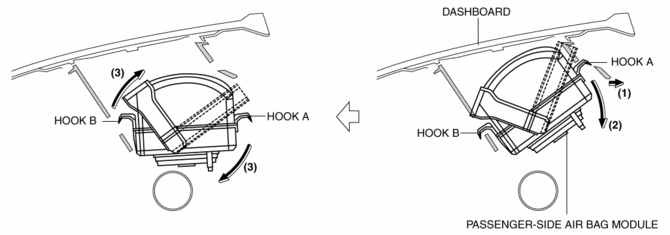
11. Move the passenger-side air bag module in the direction of the arrow (3) and detach hooks B from the dashboard.
12. Set the passenger-side air bag module bracket aside from the dashboard duct (5) while sliding the passenger-side air bag module in the direction of the arrow (4).
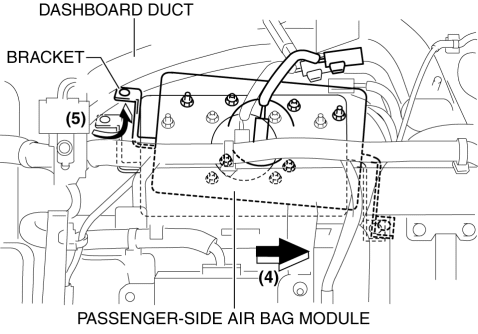
13. Remove the passenger-side air bag module.
14. Install in the reverse order of removal.
15. Switch the ignition ON (engine off or on).
16. Verify that the air bag system warning light illuminates for approx. 6 s
and goes out.
-
If the air bag system warning light does not operate, refer to the on-board diagnostic system (air bag system) and perform inspection of the system..
Screw Installation Note
NOTE:
-
The passenger-side air bag module fixing screws are set in the back side of the dashboard. Affix packing tape to phillips screwdriver so that the screws do not fall off while performing the work.
1. Insert a phillips screwdriver into the screw groove and fix it with packing tape.
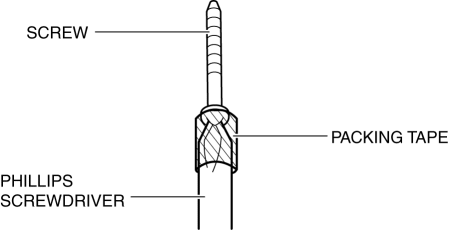
2. Tighten the screw halfway.
3. Remove the packing tape.
CAUTION:
-
If the packing tape is left in the vehicle when tightening the screw, it may become a source of noise. When tightening the screw, remove the packing tape so that it does not remain in the vehicle.
4. Tighten the screw completely.
 Passenger Sensing System [Two Step Deployment Control System]
Purpose
The passenger sensing system detects whether or not there is an occupant
on the passenger seat to control the operation (deployment) of the passenger-side
air bag system correspon ...
 Passenger Side Air Bag Module Removal/Installation [Two Step Deployment Control
System]
Passenger Side Air Bag Module Removal/Installation [Two Step Deployment Control
System]
WARNING:
Handling the air bag module improperly can accidentally deploy the air bag
module, which may seriously injure you. Read the air bag system service warnings
and cautions before h ...
Other materials:
Relay And Fuse Block Middle Cover Disassembly/Assembly
1. Insert a tape-wrapped flathead screwdriver into the service hole in the position
shown in the figure.
2. While pressing the relay and fuse block middle cover tab in the direction
of arrow (1) shown in the figure, pull out the bracket in the direction of arrow
(2) to detach the relay a ...
Driveline/Axle Abbreviations
AAS
Active Adaptive Shift
ABS
Antilock Brake System
ABDC
After Bottom Dead Center
ACC
Accessories
AFS
Adaptive Front Lighting System
ALC
...
Air Intake Control [Full Auto Air Conditioner]
Purpose
The air intake control switches the air intake port (FRESH/REC) according
to the vehicle environment.
Function
The air intake control drives the air intake actuator and switches the air
intake door position according to the operations of the REC, FRESH and defroster ...
