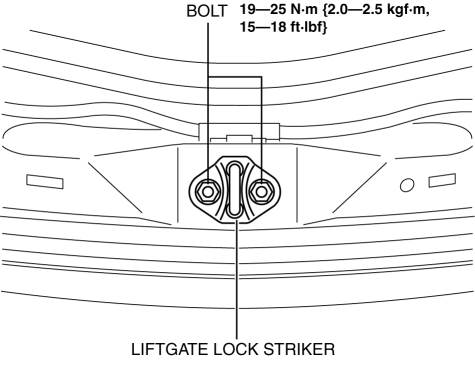
Mazda CX-5 Service & Repair Manual: Liftgate Lock Striker Removal/Installation
1. Remove the trunk end trim..
2. Remove the bolts, then remove the liftgate lock striker.
3. Install in the reverse order of removal.
4. Adjust the liftgate..
 Liftgate Light Removal/Installation
NOTE:
Fogging or condensation on the inside of the liftgate light may occur, however,
it is a natural phenomenon occurring as a result of a temperature difference
between the interior an ...
 Liftgate Lower Trim Removal/Installation
1. Remove the following parts:
a. Liftgate upper trim.
b. Liftgate side trim.
c. Liftgate recess.
2. Remove fasteners A.
3. Take the shaded area shown in the figure, and pull the liftgat ...
Other materials:
Air Fuel Ratio (A/F) Sensor Heater Control
Outline
Based on the control of the A/F sensor heater, a stabilized oxygen concentration
is detected even at low exhaust temperatures, and feedback control of fuel injection
even at cold engine start is made possible for improved cold temperature exhaust
emission performance.
...
Intake Air Temperature (Iat) Sensor
IAT Sensor No.1
Purpose/Function
Detects the IAT before it passes through the throttle body as basic information
for mainly determining the fuel injection amount.
Detects the IAT before it passes through the throttle body and inputs it
to the PCM as an IAT signal.
Constru ...
High Mount Brake Light Removal/Installation
1. Disconnect the negative battery cable..
2. Remove the liftgate upper trim..
3. Remove the rear spoiler..
4. Disconnect the connector.
5. While pressing the high-mount brake light tab in the direction of arrow (1)
shown in the figure, press the high-mount brake light in the direction ...
