Mazda CX-5 Service & Repair Manual: Liftgate Latch Switch Inspection
1. Disconnect the negative battery cable..
2. Remove the following parts:
a. Liftgate upper trim.
b. Liftgate side trim.
c. Liftgate lower trim.
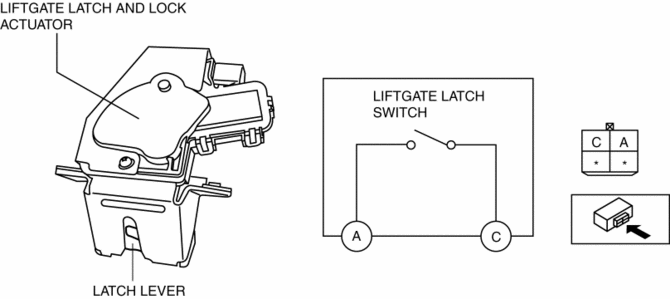
d. Liftgate latch and lock actuator.
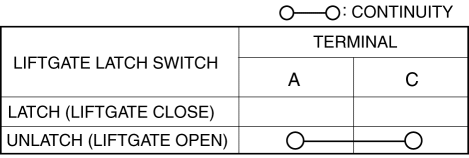
3. Verify that the continuity is as indicated in the table.
-
If not as indicated in the table, replace the liftgate latch and lock actuator.
NOTE:
-
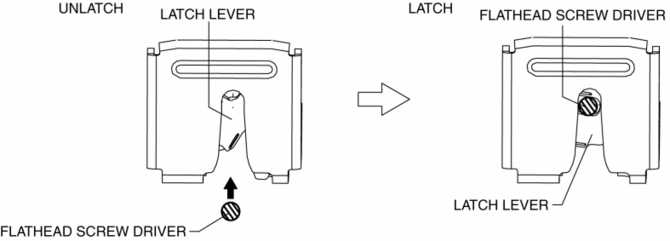
When inspecting the latch condition of the liftgate latch switch, press in the latch lever using a flathead screwdriver and set it to the latched position.
 Liftgate Latch Switch
Purpose, Function
The switch turns on/off in conjunction with the rotation of the latch lever,
and it detects the open/closed condition of the liftgate by the voltage value
which is chang ...
 Liftgate Light
Purpose
The liftgate lights are used to signal the following conditions to vehicles/people
at the rear.
Back-up lights: Signals that the vehicle is backing up.
Tailli ...
Other materials:
Cup Holder
WARNING
Never use a cup holder to hold hot liquids while the vehicle is moving:
Using a cup holder to hold hot liquids while the vehicle is moving is dangerous.
If the contents spill, you could be scalded.
Do not put anything other than cups or drink cans in cup holders:
Putting objects other ...
Heated Oxygen Sensor (HO2 S) Heater Control [Skyactiv G 2.0]
Outline
Based on the control of the HO2S heater, a stabilized oxygen concentration
is detected even at low exhaust temperatures, and feedback control of fuel injection
even at cold engine start is made possible for improved cold temperature exhaust
emission performance.
Both ...
Magnet Clutch [Manual Air Conditioner]
Purpose
The magnetic clutch transmits the rotation force from the engine to the shaft
in the A/C compressor.
Function
The magnetic clutch engages or disengages the magnetic clutch and the A/C
turns on or off by switching the power transmission from the engine.
Con ...
