Mazda CX-5 Service & Repair Manual: Liftgate Hinge Removal/Installation
1. Disconnect the negative battery cable..
2. Remove the following parts:
a. Rear scuff plate.
b. Trunk end trim.
c. Trunk side trim.
d. C-pillar trim.
e. D-pillar trim.
f. Liftgate.
3. Remove fasteners.
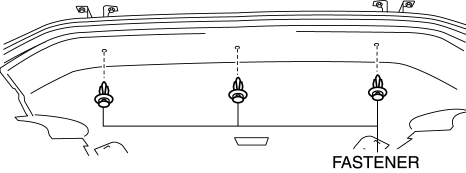
4. While partially peeling back the rear part of the headliner, remove nuts.
CAUTION:
-
Peeling back the headliner without supporting it may cause the headliner to bend excessively and create a fold seam. Peel back the headliner while supporting it.
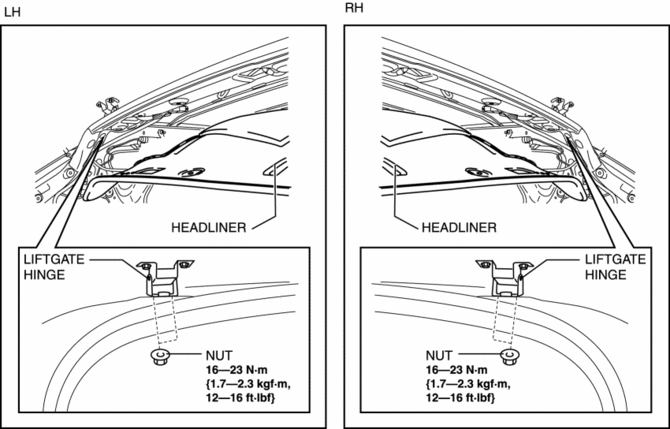
5. Remove the liftgate hinges.
6. Install in the reverse order of removal.
 Liftgate Garnish Removal/Installation
1. Disconnect the negative battery cable..
2. Remove the following parts:
a. Liftgate upper trim.
b. Liftgate side trim.
c. Liftgate recess.
d. Liftgate lower trim.
3. Disconnect the conne ...
 Liftgate Latch And Lock Actuator Inspection
The following actuator and switch are integrated with the liftgate latch
and lock actuator.
From the actuator/switch name and operation in the following table, select
the actua ...
Other materials:
Exhaust System Removal/Installation
WARNING:
A hot engine and exhaust system can cause severe burns. Turn off the engine
and wait until they are cool before removing the exhaust system.
2WD
1. Disconnect the negative battery cable..
2. Remove in the order indicated in the table.
3. Remove the insulator..
4. Ins ...
Fuel Filter (High Pressure) Removal/Installation
WARNING:
Fuel is very flammable liquid. If fuel spills or leaks from the pressurized
fuel system, it will cause serious injury or death and facility breakage. Fuel
can also irritate skin and eyes. To prevent this, always complete the “Fuel
Line Safety Procedure”, while referring ...
Efficient Removal Of Body Panels
Body Measurements
Before removal or rough?cutting, first measure the body at and around the
damaged area against the standard reference dimension specifications. If there
is deformation, use frame repair equipment to make a rough correction.
Prevention of Body Deformation
...
