Mazda CX-5 Service & Repair Manual: D Pillar Speaker Inspection
D-pillar speaker
1. Disconnect the negative battery cable..
2. Remove the following parts:
a. Trunk board.
b. Trunk end trim.
c. Rear scuff plate.
d. Trunk side trim.
e. D-pillar trim.
3. Disconnect the D-pillar speaker connector..
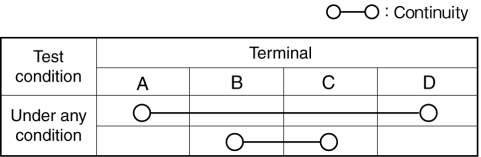
4. Verify that the resistance between the D-pillar speaker terminals is as indicated in the table.
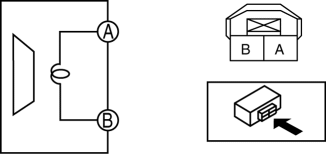
-
If not as indicated in the table, replace the D-pillar speaker.

Short-cord
1. Disconnect the negative battery cable..
2. Remove the following parts:
a. Trunk board.
b. Trunk end trim.
c. Rear scuff plate.
d. Trunk side trim.
e. D-pillar trim.
3. Disconnect the D-pillar speaker connector..
4. Verify that the continuity between the short-cord terminals is as indicated in the table.
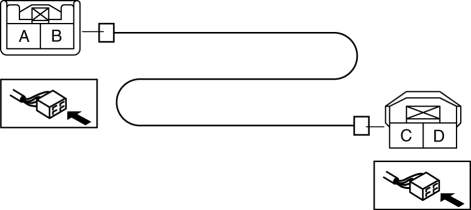
-
If not as indicated in the table, replace the short-cord.
 Coil Antenna
Purpose
Sends the ID data programmed to the electronic transmission device (transponder)
in the remote transmitter to the start stop unit.
Function
A magnetic field occurs aroun ...
 D Pillar Speaker Removal/Installation
1. Disconnect the negative battery cable..
2. Remove the following parts:
a. Trunk board.
b. Trunk end trim.
c. Rear scuff plate.
d. Trunk side trim.
e. D-pillar trim.
3. Disconnect the ...
Other materials:
Active Command Modes Inspection [Front Body Control Module (Fbcm)]
1. Connect the M-MDS to the DLC-2.
2. After the vehicle is identified, select the following items from the initialization
screen of the M-MDS.
a. Select “DataLogger”.
b. Select “Modules”.
c. Select “F_BCM”.
3. Select the active command modes from the PID table.
4. Perform t ...
Air Bag Module And Pre Tensioner Seat Belt Disposal Procedures [Standard Deployment
Control System]
WARNING:
A live (undeployed) air bag module or pre-tensioner seat belt may accidentally
operate (deploy) when it is disposed of and cause serious injury. Always refer
to the “AIR BAG MODULE AND PRE-TENSIONER SEAT BELT DEPLOYMENT PROCEDURES”
and dispose of air bag modules a ...
Resistor [Manual Air Conditioner]
Purpose
The resistor controls the blower motor rotation speed.
Function
The resistor controls the supply voltage to the blower motor according to
the fan switch operation, and adjusts the fan rotation speed (airflow volume).
Construction
The resistor is installed ...
