Mazda CX-5 Service & Repair Manual: Map Light Inspection
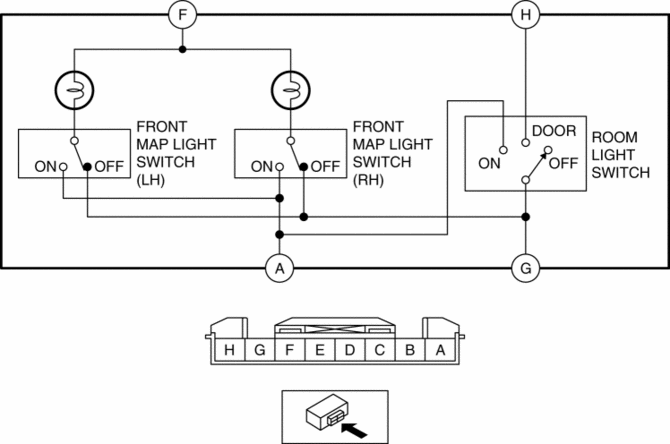
Front Map Light
1. Disconnect the negative battery cable..
2. Remove the front map light..
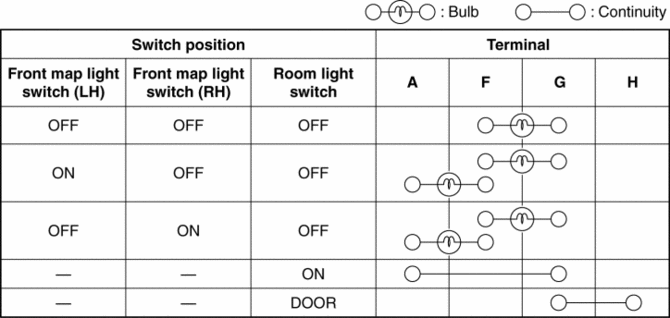
3. Verify that the continuity between the front map light terminals is as indicated in the table.
-
If not as indicated in the table, replace the front map light or front map light bulb..
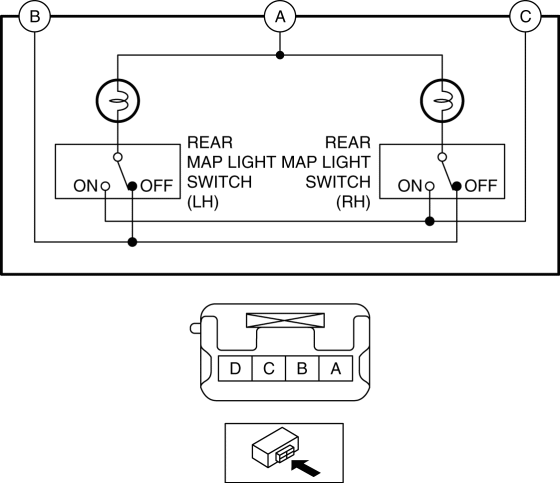
Rear Map Light
1. Disconnect the negative battery cable..
2. Remove the following parts:
a. Sunroof seaming welt (vehicles with sunroof).
b. A-pillar trim.
c. Sunvisor.
d. Front scuff plate.
e. Rear scuff plate.
f. B-pillar lower trim.
g. Adjust anchor cover.
h. Upper anchor installation bolt on the seat belt.
i. B-pillar upper trim.
j. Assist handle.
k. Trunk board.
l. Trunk end trim.
m. Trunk side trim.
n. D-pillar trim.
o. C-pillar trim.
p. Headliner.
q. Rear map light.
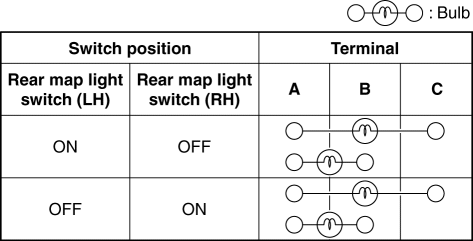
3. Verify that the continuity between the rear map light terminals is as indicated in the table.
-
If not as indicated in the table, replace the rear map light.
 Map Light Bulb Removal/Installation
Front Map Light
1. Disconnect the negative battery cable..
2. To prevent scratches or damage, affix protective tape to the position shown
in the figure.
CAUTION:
If a flathead screwdriv ...
 Map Light Removal/Installation
Front Map Light
1. Disconnect the negative battery cable..
2. Open the sunglasses holder.
3. Remove the screws from the front map light.
4. Move the front map light in the direction of the ...
Other materials:
Front ABS Wheel Speed Sensor Removal/Installation
1. Remove the mudguard..
2. Remove in the order indicated in the table.
3. Install in the reverse order of removal.
4. After installation, verify that there is no twisting in the front ABS wheel-speed
sensor.
1
Connector
2
Bolt
...
Hood Release Cable Removal/Installation
1. Disconnect the negative battery cable..
2. Remove the following parts:
a. Front bumper.
b. Front combination light (LH).
c. Front mudguard (LH).
d. Hood release lever.
3. Disconnect the hood release cable from the hood latch.
4. While pressing the tabs of the clip in the direction o ...
Piston, Piston Ring, Piston Pin
Purpose, Function
Piston
The piston in the cylinder of the cylinder block moves reciprocally by the
pressure received when the air-fuel mixture combusts.
Piston ring
The piston ring consists of the compression ring (top ring, second ring)
and the oil ring, and has the foll ...
