Mazda CX-5 Service & Repair Manual: Key Cylinder Switch
Purpose
-
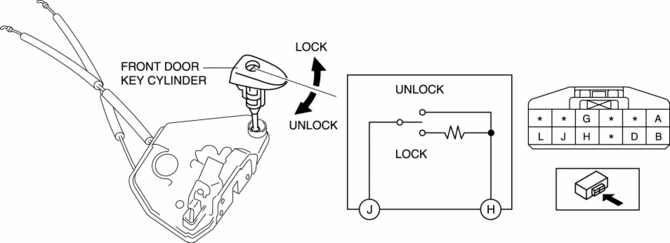
The switch turns on/off in conjunction with the front door key cylinder lock/unlock and the rear body control module (RBCM) detects the key cylinder operation condition by the change in the voltage.
Function
-
The key cylinder switch contact point changes in conjunction with the front door key cylinder lock/unlock operation.
Construction
-
Built into the driver's side front door latch and lock actuator.
-
The front door key cylinder is connected to the front door latch and lock actuator, and the front door key cylinder is rotated to directly switch the key cylinder switch.
-
When the front door key cylinder is not operated, the key cylinder switch is off (contact point: Open).
Operation
Lock operation
-
When the key is inserted in the front door key cylinder and it is rotated in the lock direction, the key cylinder switch switches to the lock side, and the lock-side switch turns on (contact point: Closed).
Unlock operation
-
When the key is inserted in the front door key cylinder and it is rotated in the unlock direction, the key cylinder switch switches to the unlock side, and the unlock-side switch turns on (contact point: Closed).
Fail-safe
-
Function not equipped.
 Front Door Key Cylinder Switch Inspection
1. Perform the front door glass preparation..
2. Disconnect the negative battery cable..
3. Remove the following parts:
a. Inner garnish.
b. Front door trim.
c. Front door key cylinder.
d. ...
 Storage
...
Other materials:
Engine Coolant Protection Inspection
1. Measure the engine coolant temperature and specific gravity using a thermometer
and a hydrometer.
CAUTION:
Use engine coolant at a concentration that meets the environmental conditions
in which the vehicle is driven, otherwise engine damage could occur.
The engine has alumi ...
Tire Pressure Warning Alarm
Purpose
The tire pressure warning alarm warns the user that a tire pressure has decreased
or notifies the user that the tire pressure warning alarm has been reset.
Function
If the instrument cluster receives a tire pressure warning alarm request
signal sent from the D ...
Controller Area Network (Can) System
Outline
A CAN system has been adopted which can send and receive multiple signals
over a single communication path from related modules.
System wiring diagram
HS-CAN
MS-CAN
Structure
The CAN system consists of CAN system-related modules built into the CPU
...
