Mazda CX-5 Service & Repair Manual: Rear Coil Spring Removal/Installation
WARNING:
-
Be careful not to allow the coil spring to fly off when removing/installing the coil spring. Otherwise, the coil spring could fly off and cause serious injury or death, or damage to the vehicle.
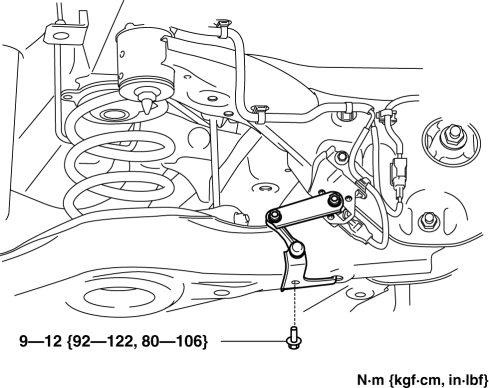
1. When working on the left side of the vehicle, disconnect the auto leveling sensor link..
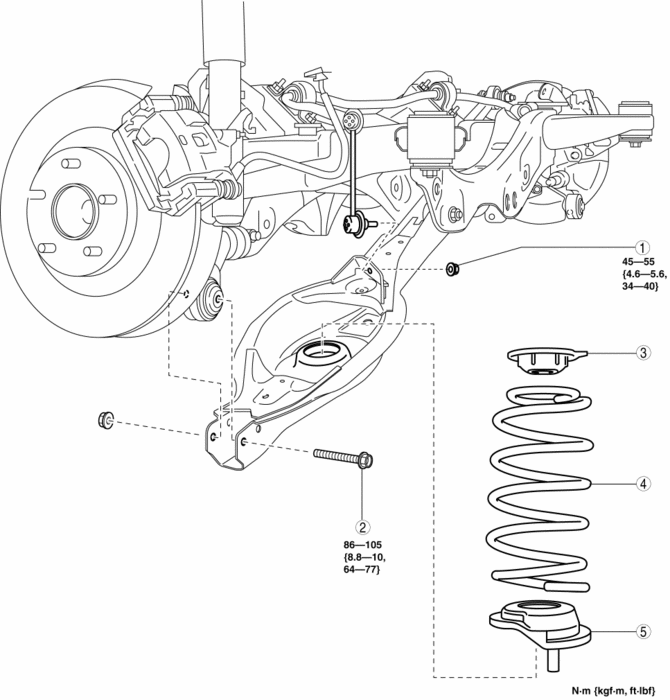
2. Remove in the order indicated in the table.
3. Install in the reverse order of removal.
4. Inspect the wheel alignment and adjust it if necessary..
|
1 |
Rear stabilizer control link lower side nut |
|
2 |
Rear lower arm outer bolt (See Rear Coil Spring Removal Note.) |
|
3 |
Upper spring seat rubber |
|
4 |
Rear coil spring (See Rear Coil Spring Installation Note.) |
|
5 |
Lower spring seat rubber |
Rear Coil Spring Removal Note
1. Support the rear lower arm using a jack.
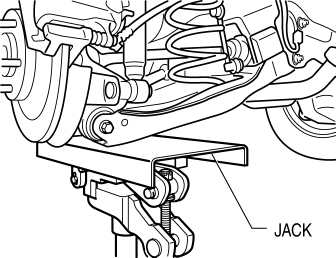
2. Remove the rear lower arm outer bolt.
3. Remove the rear coil spring.
Rear Coil Spring Installation Note
1. Position the jack under the rear lower arm and jack up slowly.
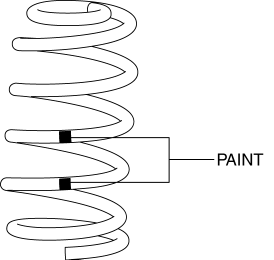
2. Install the rear coil spring so that the light green paint is pointed upward of the vehicle.
3. Align the upper end of the rear coil spring with the step of the upper spring seat rubber.
4. Align the lower end of the rear coil spring with the step of the lower spring seat rubber.
5. Install the rear lower arm outer bolt.
 Rear Axle
Purpose, Function
An angular ball bearing, with a low rotational resistance, has been adopted,
improving driveability.
A unit bearing that does not require pre-load setting has bee ...
 Rear Drive Shaft
Purpose, Function
Engine noise and vibration have been reduced due to adoption of a bell joint
on the wheel side of the constant velocity joint.
A low noise and vibration double of ...
Other materials:
Fuel Gauge
Purpose
The fuel gauge notifies the user of the amount of remaining fuel.
Function
The instrument cluster calculates the amount of fuel in the fuel tank based
on the following CAN signals and displays the fuel gauge segments.
Fuel gauge sender unit voltage signal ...
Remote Transmitter Battery Voltage Inspection
NOTE:
Because the remote transmitter battery power cannot be determined using the
battery itself, determine by the remote transmitter battery low warning operation
conditions.
Operation procedure for remote transmitter battery low warning
1. Place the remote transmitter inside t ...
Clock Spring Adjustment [Two Step Deployment Control System]
1. Set the front wheels straight ahead.
CAUTION:
The clock spring will break if over?wound. Do not forcibly turn the clock
spring.
2. Turn the clock spring clockwise until it stops.
3. Turn the clock spring counterclockwise approx. 2 turns.
4. Align the mark on the clo ...
