Mazda CX-5 Service & Repair Manual: Inspection Of SST (Deployment Tool) [Two Step Deployment Control System]
1. Before using the SST
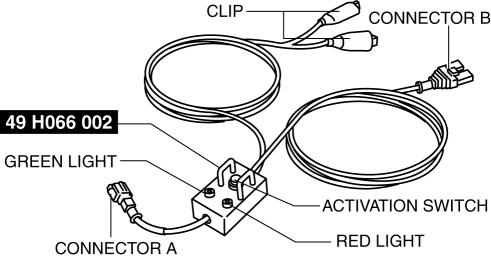
(49 H066 002), inspect its operation.
Inspection Procedure
1. Follow the steps below to inspect the SST
(49 H066 002).

-
If not as indicated in the table, replace the SST
(49 H066 002) because it has a malfunction.
WARNING:
-
Do not use a malfunctioning SST (49 H066 002), otherwise it could cause the air bag module, pre-tensioner seat belt or lap pre-tensioner seat belt to accidentally operate (deploy).
CAUTION:
-
Because the permissible voltage for the SST (49 H066 002) is 12 V, do not connect a 24 V power source because it will damage the SST. Always connect only a 12 V power source.
|
Step |
Inspection procedure |
Light condition |
|
|
Green |
Red |
||
|
1 |
Connect the power supply red clip to the positive battery terminal, and the black clip to the negative battery terminal. |
On |
Off |
|
2 |
Connect connectors A and B. |
Off |
On |
|
3 |
Press the activation switch. |
On |
Off |
 Inspection Of SST (Deployment Tool) [Standard Deployment Control System]
1. Before using the SST (49 H066 002), inspect its operation.
Inspection Procedure
1. Follow the steps below to inspect the SST (49 H066 002).
If not as indicated in the table, repl ...
 Ion Sensor Inspection
DTC Inspection
1. Connect the M-MDS to the DLC?2.
2. Perform the DTC inspection using the M-MDS..
If any DTC related to the ignition coil/ion sensor is present, repair the
malfunctioning ...
Other materials:
Windshield Washer Hose Removal/Installation
1. Disconnect the negative battery cable..
2. Remove the front over fender..
3. Remove the mudguard (RH)..
4. Remove the windshield wiper arm and blade..
5. Disconnect the windshield washer hose A from the washer motor.
6. Remove the windshield washer hose A from the washer tank hook.
7. ...
Steering SST
49 T028 3A0
Ball joint puller set
49 T025 001
Boot clamp crimpers
49 B032 317
Bearing & oil seal remover
49 B018 003
Body B
49 E032 308
Wrench
...
Antenna Feeder No.1 Inspection
With audio system
1. Disconnect the negative battery cable..
2. Remove the following parts:
a. A-pillar trim (RH).
b. Decoration panel.
c. Audio unit.
3. Disconnect antenna feeder No.2.
4. Verify that the continuity between antenna feeder No.1 terminals is as indicated
in the tabl ...
