Mazda CX-5 Service & Repair Manual: Hood Release Cable Removal/Installation
1. Disconnect the negative battery cable..
2. Remove the following parts:
a. Front bumper.
b. Front combination light (LH).
c. Front mudguard (LH).
d. Hood release lever.
3. Disconnect the hood release cable from the hood latch.
4. While pressing the tabs of the clip in the direction of arrow (1) shown in the figure, pull the clip in the direction of arrow (2) to detach it from the body.
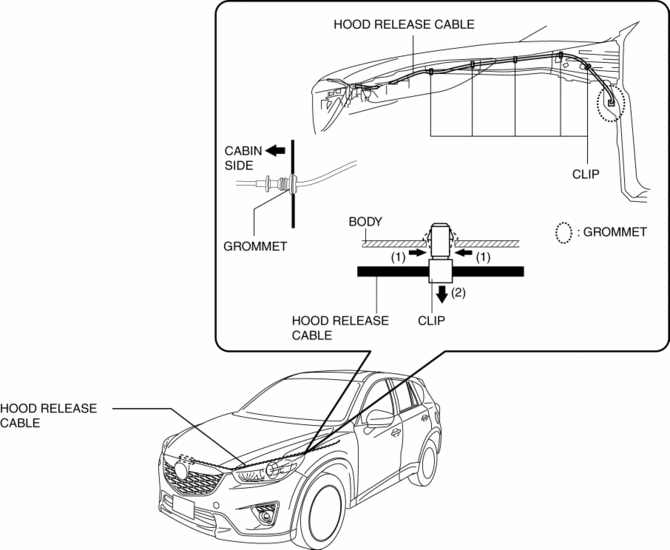
5. Remove the clip from the body.
6. Press the grommet into the cabin side.
7. Remove the hood release cable from the cabin side.
8. Install in the reverse order of removal.
 Hood Latch Switch Inspection
1. Disconnect the negative battery cable..
2. Remove the front bumper..
3. Disconnect the hood latch switch connector..
4. Verify that the continuity is as indicated in the table.
NOTE:
...
 Hood Removal/Installation
WARNING:
Removing the hood without supporting it could cause the hood to fall and
cause serious injury. Always perform the procedure with at least another person
to prevent the hood from ...
Other materials:
Accelerator Pedal Removal/Installation
1. Disconnect the negative battery cable..
2. Remove in the order indicated in the table.
1
APP sensor connector
2
Accelerator pedal
3. Install in the reverse order of removal. ...
Driveline/Axle SST
Front and Rear Axle
49 T028 3A0
Ball joint puller set
49 T028 301
Dust boot installer
49 U034 204
Dust boot installer
49 W032 310
Support block
—
— ...
Automatic Transaxle Removal/Installation [Fw6 Ax EL]
CAUTION:
Performing the following procedures without first removing the front ABS
wheel-speed sensor may possibly cause an open circuit in the harness if it is
pulled by mistake. Before performing the following procedures, disconnect the
front ABS wheel-speed sensor (axle side) and ...
