Mazda CX-5 Service & Repair Manual: Hood Latch Switch
Purpose
-
Detects the open/closed condition of the hood.
Function
-
The hood latch switch is utilized in the theft-deterrent system control.
-
For the theft-deterrent system, refer to (see THEFT-DETERRENT SYSTEM.).
Construction
-
Built into the hood latch.
-
Switch turns on and off by the rotation of the latch bar.
-
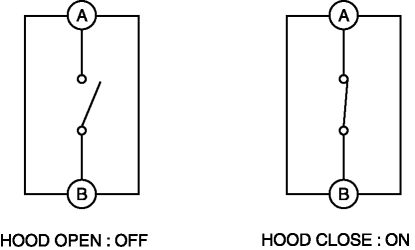
When the hood is completely closed, the hood latch switch is on (contact point: closed).
Operation
Hood close (latch) operation
1. When the hood is closed, the hood lock striker enters the latch lever groove.
2. When the hood is then further closed, the latch lever is pressed by the hood lock striker and rotates.
3. When the hood is completely closed, the latch lever is in a latched condition and presses the hood latch switch which turns the switch on.
Hood open (unlatch) operation
1. When the hood release lever is pulled, the hood opens and the latch lever is in an unlatched condition, and the hood latch switch turns off.
Fail-safe
-
Function not equipped.
 Hood Latch And Release Lever Removal/Installation
Hood Latch
1. Open the hood.
2. Disconnect the negative battery cable..
3. Remove the front bumper..
4. Insert a tape-wrapped flathead screwdriver into the position shown in the
figure.
...
 Hood Latch Switch Inspection
1. Disconnect the negative battery cable..
2. Remove the front bumper..
3. Disconnect the hood latch switch connector..
4. Verify that the continuity is as indicated in the table.
NOTE:
...
Other materials:
Crankshaft Position (CKP) Sensor Removal/Installation
CAUTION:
When foreign material such as an iron chip is on the CKP sensor, it can cause
abnormal output from the sensor because of flux turbulence and adversely affect
the engine control. Be sure there is no foreign material on the CKP sensor when
replacing.
Do not assemble t ...
Connecting Rod, Connecting Rod Bearing
Purpose, Function
Connecting rod
The connecting rod transmits the reciprocating movement of the piston to
the crankshaft by engaging the piston pin and crank pin.
Connecting rod bearing
The connecting rod bearing forms an oil film on the outer surface of the
crank pin to p ...
Controller Area Network (Can) Outline
The Electric Power Steering (EPS) control module sends and receives data
to and from other modules via the CAN..
Data sent
EPS status
Power steering malfunction indicator light on request
Steering angle
Data received
Vehicle speed
Engine spe ...
