Mazda CX-5 Service & Repair Manual: Front Wiring Harness Protector Removal/Installation
Front Wiring Harness Protector No.1
1. Disconnect the negative battery cable..
2. Remove the air cleaner case..
3. While pressing the tabs of clip A in the direction of the arrows (1) shown in the figure, pull clip A in the direction of the arrow (2) shown in the figure to detach the tab of clip A from the radiator.
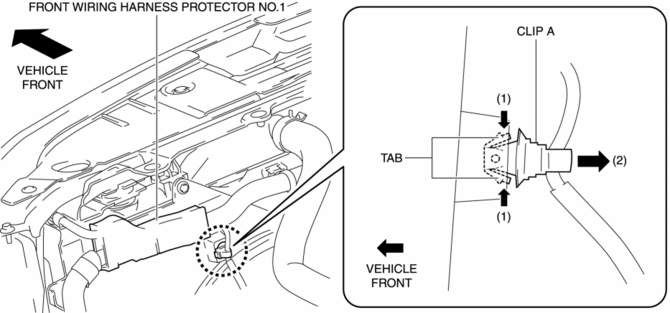
4. Detach clip A.
5. Insert a tape-wrapped flathead screwdriver into the service hole in the position shown in the figure.

6. While pressing the tabs of clip B in the direction of the arrows (3) shown in the figure, pull clip B in the direction of the arrow (4) shown in the figure to detach the tab of clip B from the radiator.
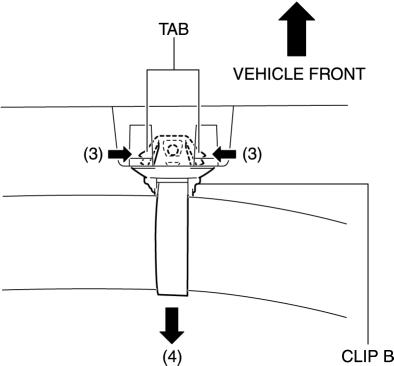
7. Detach clip B.
8. While pressing the tabs of clip C in the direction of the arrows (5) shown in the figure, pull clip C in the direction of the arrow (6) shown in the figure to detach the tab of clip C from the front bumper.
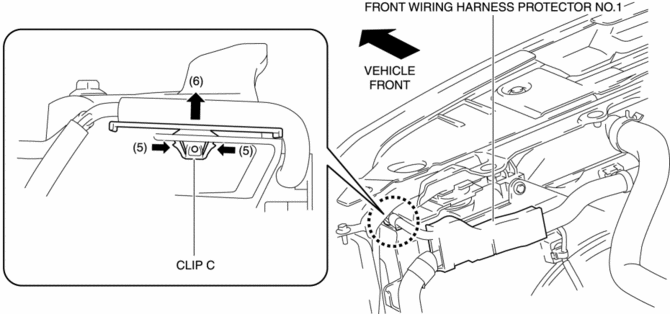
9. Remove clip C.
10. While pressing the clip tabs in the direction of the arrows (7) shown in the figure, pull the clip in the direction of the arrow (8) to detach the clip tabs from the radiator.
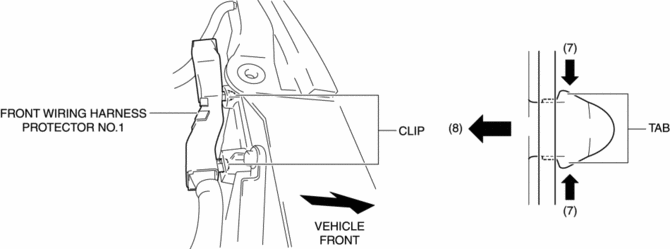
11. Detach all the clip tabs and remove the clips.
12. Insert a flathead screwdriver into the position shown in the figure.
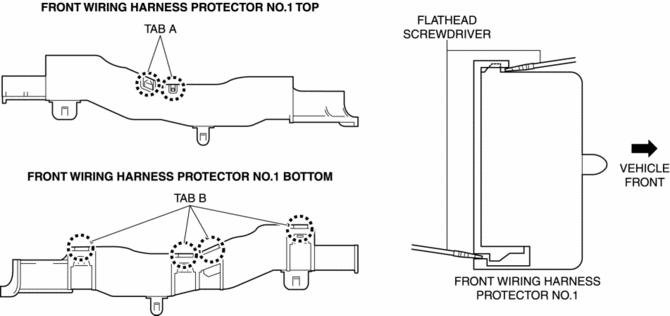
13. While lifting up the hooks in the direction of the arrows (9) shown in the figure using a flathead screwdriver, pull the hooks in the direction of the arrows (10) shown in the figure to detach the tabs from the hooks.
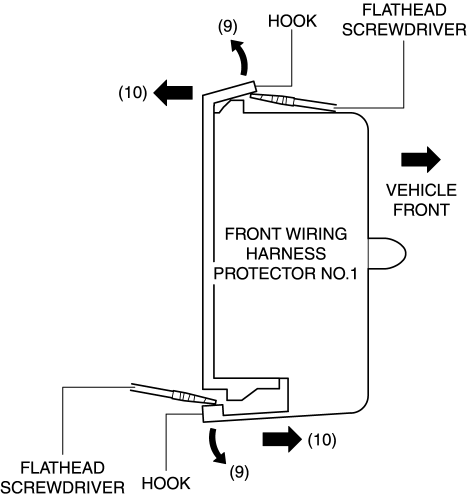
14. Detach all the tabs and hooks and remove front wiring harness protector No.1.
15. Install in the reverse order of removal.
Front Wiring Harness Protector No.2
1. Remove the battery tray..
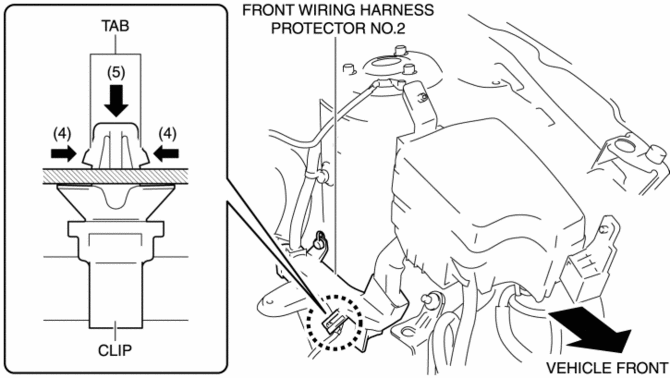
2. While pressing the clip tabs in the direction of arrows (1) shown in the figure, pull the clip in the direction of arrow (2) to detach it from the engine mount.
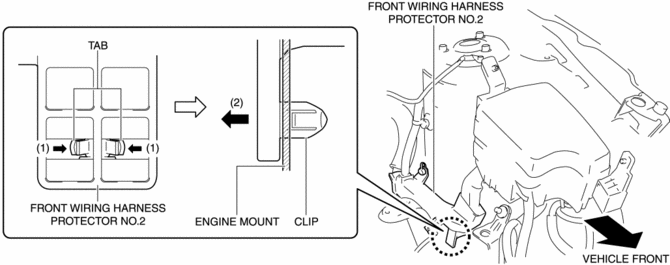
3. Remove the clip.
4. Remove the cap in the direction of the arrow (3) shown in the figure.
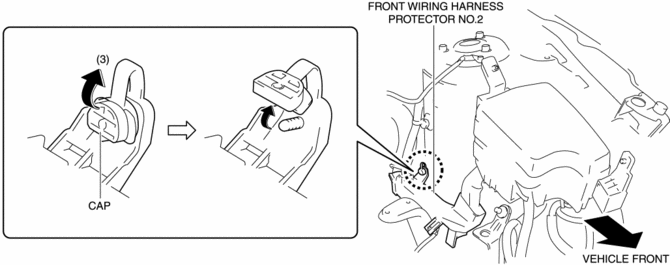
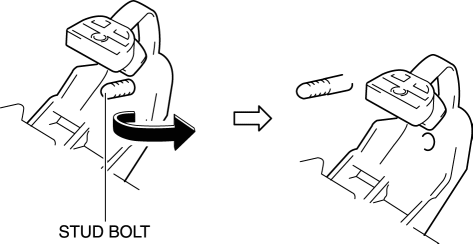
5. Pull out front wiring harness protector No.2 from the stud bolt and set it aside as shown in the figure.
6. While pressing the clip tabs in the direction of the arrows (4) shown in the figure, push out the clip in the direction of the arrow (5) shown in the figure to detach the clip tabs from front wiring harness protector No.2.
7. Remove the clip.
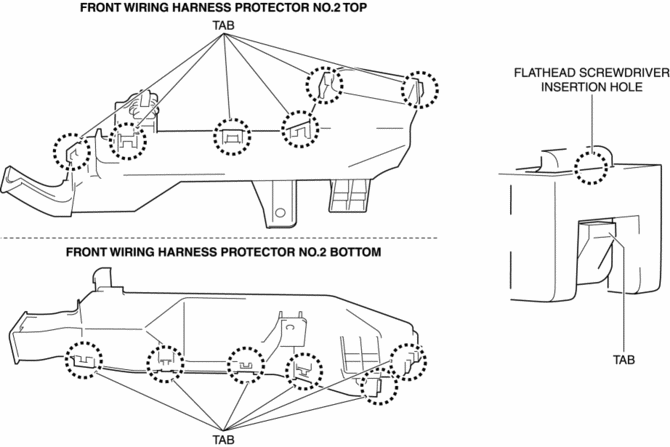
8. Insert a tape-wrapped flathead screwdriver into the gap between front wiring harness protector No.2 and the tabs shown in the figure.
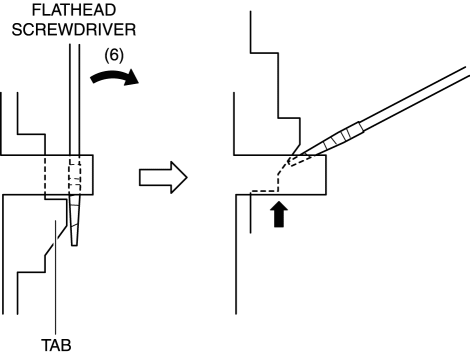
9. Move the flathead screwdriver in the direction of the arrow (6) shown in the figure, lift up the front wiring harness protector No.2 tab to detach the tab from front wiring harness protector No.2.
10. Detach all the tabs and front wiring harness protector No.2 and remove front wiring harness protector No.2.
11. Install in the reverse order of removal.
 Body And Accessories SST
49 L067 001
Reflector
49 L067 002
Tripod
49 L067 003
Plum-bob
49 L067 006
Plum-bob
...
 Identification Number Locations
Vehicle Identification Number (VIN)
If the VIN plate is adhered to the dashboard, it is located in the position
shown in the figure.
Engine Type/Number
SKYACTIV-G 2.0
SKYAC ...
Other materials:
Automatic Transaxle Outline [Fw6 A EL, Fw6 Ax EL]
Outline
Contribution to low fuel economy
Wide TCC range
Clutch/brake resistance reduction
Realized direct feel and quick shifting
Oil passage resistance reduction and improved clutch/brake response
b ...
Clock Spring Adjustment [Two Step Deployment Control System]
1. Set the front wheels straight ahead.
CAUTION:
The clock spring will break if over?wound. Do not forcibly turn the clock
spring.
2. Turn the clock spring clockwise until it stops.
3. Turn the clock spring counterclockwise approx. 2 turns.
4. Align the mark on the clo ...
Exhaust System
Purpose, Outline
A 4-2-1 exhaust system has been adopted which reduces residual gas in the
cylinders using the scavenging effect and contributes to a high compression
ratio.
The loop structure of the exhaust pipes for the 4-2-1 system takes up less
space.
Structural Vie ...
