Mazda CX-5 Service & Repair Manual: Front Under Cover No.1 Removal/Installation
1. Remove bolts A.
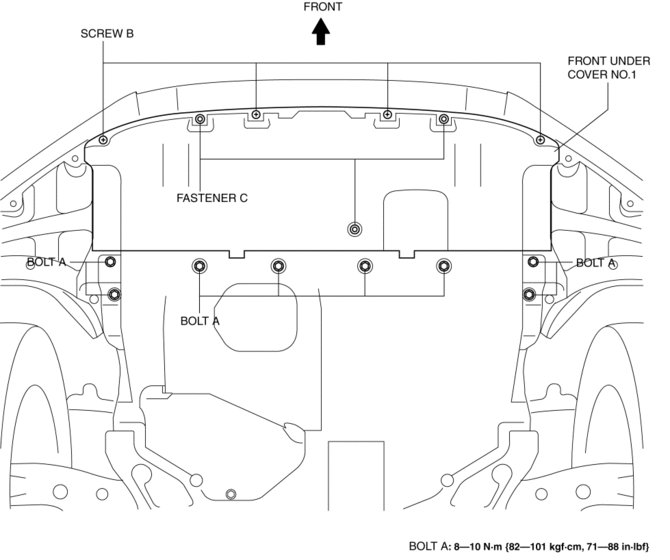
2. Remove screws B.
3. Remove fasteners C.
4. Remove the front under cover No.1 in the direction of the arrow in the order of (1), (2) shown in the figure while detaching the guide D.

5. Install in the reverse order of removal.
 Front Over Fender Removal/Installation
1. Remove fastener A.
2. Pull the front over fender lower in the direction of the arrow (1) while removing
hook B and pin C.
3. Remove fasteners D.
4. Pull the front over fender upper ...
 Front Under Cover No.2 Removal/Installation
1. Lift up the vehicle.
2. Remove the front under cover No.1..
3. Remove bolts A.
4. Remove fasteners B.
5. Remove the front under cover No.2.
6. Install in the reverse order of removal. ...
Other materials:
Steering SST
49 T028 3A0
Ball joint puller set
49 T025 001
Boot clamp crimpers
49 B032 317
Bearing & oil seal remover
49 B018 003
Body B
49 E032 308
Wrench
...
Floor Side Panel Removal [Panel Replacement]
Symbol Mark
Removal Procedure
1. Drill the 35 locations indicated by (A) shown in the figure, then remove the
floor side panel No.1.
2. Drill the 5 locations indicated by (B) shown in the figure.
3. Drill the 4 locations indicated by (C) from rear wheel housing shown in the
figure. ...
Hood
WARNING
Always check that the hood is closed and securely locked:
A hood that is not closed and securely locked is dangerous as it could fly open
while the vehicle is moving and block the driver's vision which could result in
a serious accident.
Opening the Hood
1. With the vehicle parke ...
