Mazda CX-5 Service & Repair Manual: Front Door Latch Switch
Purpose, Function
-
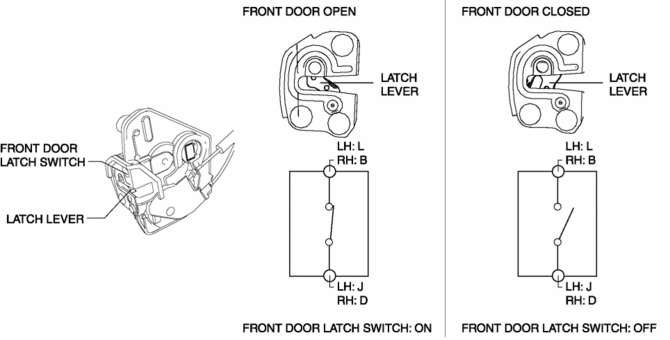
Switches on/off in conjunction with the latch lever rotation, and detects the front door open/closed condition by the voltage which is changed by the rear body control module (RBCM).
Construction
-
The switch is turned on/off by the rotation of the latch lever.
-
When the front door is completely opened, the front door latch switch turns on (contact point: Closed).
Operation
Door open (unlatch) operation
1. When the inner or outer handle is operated, the door opens, the latch lever is in an unlatched condition, and the front door latch switch turns on.
Door closed (latched) operation
1. When a door is closed, the front door lock striker enters the latch lever groove.
2. When the door is further closed, the latch lever is pressed by the front door lock striker and it rotates.
3. When the door is completely closed, the latch lever is in a latched condition, the front door latch switch turns off.
Fail-safe
-
Function not equipped.
 Front Door Latch And Lock Actuator Removal/Installation
1. Perform the front door glass preparation..
2. Disconnect the negative battery cable..
3. Remove the following parts:
a. Inner garnish.
b. Front door trim.
c. Inner handle.
d. Front door ...
 Front Door Latch Switch Inspection
1. Perform the front door glass preparation..
2. Disconnect the negative battery cable..
3. Remove the following parts:
a. Inner garnish.
b. Front door trim.
c. Front door glass.
d. Front ...
Other materials:
Fuel Pump Unit Disassembly/Assembly
WARNING:
Fuel is very flammable liquid. If fuel spills or leaks from the pressurized
fuel system, it will cause serious injury or death and facility breakage. Fuel
can also irritate skin and eyes. To prevent this, always complete the “Fuel
Line Safety Procedure”, while referring ...
Magnetic Clutch Disassembly/Assembly [Full Auto Air Conditioner]
1. Disassemble in the order indicated in the table.
1
Bolt
(See Bolt Removal/Installation Note.)
2
Pressure plate
3
Shim
(See Shim Installation Note.)
4
Snap ring
(See Snap Ring ...
Front Parking Brake Cable Removal/Installation
1. Remove the front console box..
2. Remove the shift lever knob. (MTX).
3. Remove the shift panel..
4. Remove the upper panel..
5. Remove the rear console..
6. Remove in the order indicated in the table.
7. Install in the reverse order of removal.
8. After installation, inspect the pa ...
