Mazda CX-5 Service & Repair Manual: Floor Covering Removal/Installation
1. Disconnect the negative battery cable..
2. Remove the following parts:
a. Front scuff plate.
b. Front side trim.
c. Rear scuff plate.
d. B-pillar lower trim.
e. Rear seat cushion.
f. Front seat.
g. Lower anchor of the front seat belt (without lap pre-tensioner seat belt).
h. Lap pre-tensioner seat belt (with lap pre-tensioner seat belt).
i. Shift lever knob (MTX).
j. Front console box.
k. Shift panel.
l. Upper panel.
m. Rear console.
n. Side wall.
o. Front console.
p. SAS control module.
q. Parking brake lever.
r. Joint cover.
3. Remove fasteners.
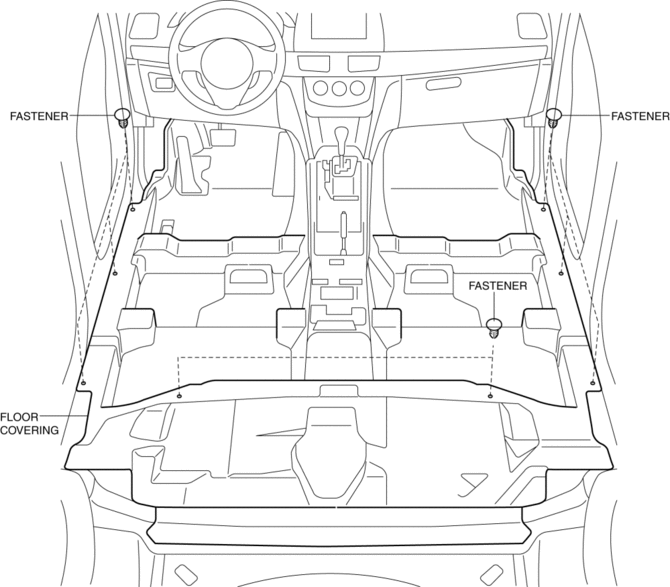
4. Take the floor covering out from the opened door.
5. Install in the reverse order of removal.
 Decoration Panel Removal/Installation
CAUTION:
Affix protective tape to the position shown in the figure.
1. Disconnect the negative battery cable..
2. Open the glove compartment.
3. Insert a tape-wrapped flathead ...
 Floor Insulator Removal/Installation
Driver-side
1. Disconnect the negative battery cable..
2. Remove the following parts:
a. Driver-side front scuff plate.
b. Driver-side front side trim.
c. Decoration panel.
d. Shift lever k ...
Other materials:
Differential Oil Temperature Sensor Inspection
WARNING:
Hot differential oil may cause severe burns. Do not perform maintenance while
differential oil is hot.
1. Disconnect the negative battery cable.
2. Disconnect the differential oil temperature sensor connector and remove the
differential oil temperature sensor.
3. Wrap ...
Electronic Spark Advance Control [Skyactiv G 2.0]
Outline
Controls ignition to optimum timing according to engine operation conditions.
Serviceability has been improved by eliminating the necessity of ignition
timing adjustment.
The PCM determines the engine operation conditions based on input signals
from each sensor a ...
Steering Angle Sensor Inspection
1. Remove the column cover..
2. Connect the plus (+) end of a tester to steering angle sensor terminal A and
the minus (-) end of the tester to terminal B (GND).
3. Switch the ignition ON (engine off or on).
4. Turn the steering wheel to the left and right.
5. Verify that the voltage f ...
