
Mazda CX-5 Service & Repair Manual: Engine Oil Pressure Warning Light
Purpose
-
The engine oil pressure warning light warns the driver that the engine oil level is insufficient.
Function
-
When the instrument cluster receives the engine oil pressure warning light request signal sent from the PCM via the CAN signal, it illuminates the engine oil pressure warning light.
Construction
-
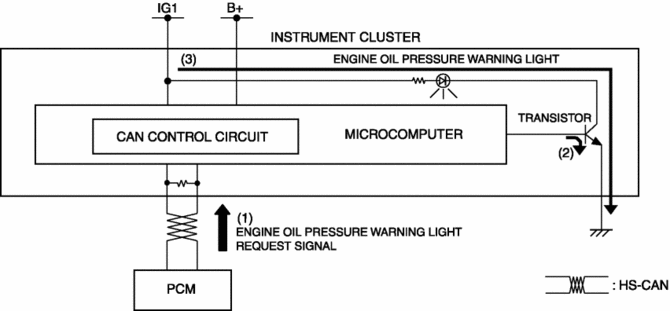
The instrument cluster controls illumination on/off of the engine oil pressure warning light using the instrument cluster microcomputer based on the engine oil pressure warning light request signal from the PCM.
-
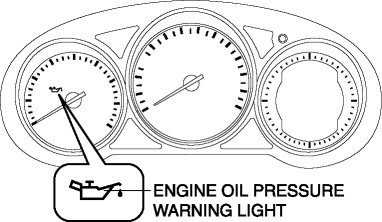
The engine oil pressure warning light is set in the instrument cluster.
Operation
1. The instrument cluster receives (1) the engine oil pressure warning light request signal from the PCM.
2. The instrument cluster microcomputer turns the transistor on (2) based on the engine oil pressure warning light request signal.
3. When the transistor turns on, a ground circuit with the engine oil pressure warning light is established and the engine oil pressure warning light illuminates (3).
Fail-safe
-
Function not equipped.
 Engine Oil Level Inspection
1. Position the vehicle on level ground.
2. Warm up the engine.
3. Stop the engine and allow at least 5 min before continuing.
4. Remove the dipstick, wipe it cleanly, and reinstall it fully.
...
 Engine Oil Replacement
WARNING:
Hot engines and engine oil can cause severe burns. Turn off the engine and
wait until it and the engine oil have cooled.
A vehicle that is lifted but not securely supported ...
Other materials:
Side Air Bag Sensor No. 1 Removal/Installation [Standard Deployment Control
System]
WARNING:
Handling the side air bag sensor improperly can accidentally operate (deploy)
the air bag module, which may seriously injure you. Read the air bag system
service warnings and cautions before handling the side air bag sensor..
1. Switch the ignition to off.
2. Disconnec ...
Vanity Mirror Illumination Inspection
1. Disconnect the negative battery cable..
2. Remove the sunvisor..
3. Verify that the continuity between the vanity mirror illumination terminals
is as indicated in the table.
If not as indicated in the table, replace the sunvisor.
...
How To Use This Manual
Range of Topics
This manual contains procedures for performing all required service operations.
The procedures are divided into the following five basic operations:
Removal/Installation
Disassembly/Assembly
Replacement
Inspection
Adj ...
