Mazda CX-5 Service & Repair Manual: Drive Belt Removal/Installation
WARNING:
-
A hot engine can cause severe burns. Turn off the engine and wait until it is cool before servicing.
NOTE:
-
Remove/install the drive belt from the underside of the vehicle.
Generator Drive Belt Removal/Installation
CAUTION:
-
To prevent damage to the drive belt auto tensioner, do not apply excessive torque after the tensioner moves full-stroke.
1. Remove the splash shield..
2. Insert a wrench onto the cast hexagon on the drive belt auto tensioner and release the tension by slowly turning in the direction shown in the figure.
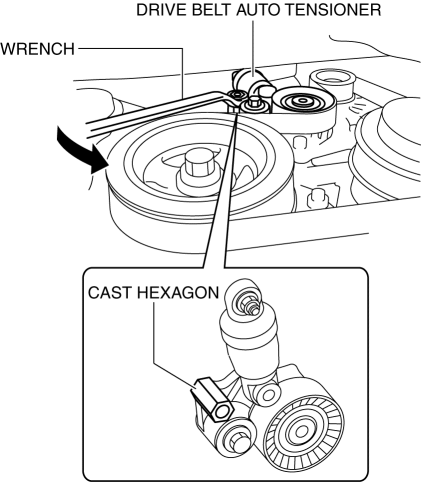
3. Remove the generator drive belt.
4. Install the generator drive belt.
5. Rotate the crankshaft pulley clockwise approx. halfway and verify that the generator drive belt is installed correctly.
-
If the rib of the drive belt and the groove of each pulley are not aligned, remove the drive belt and re-install it.
6. Verify that the indicator part of the cast hexagon on the drive belt auto tensioner is within the normal range..
7. Install the splash shield..
Water Pump Drive Belt
Removal
1. Remove the generator drive belt..
2. Apply a clean cloth to the water pump drive belt as shown in the figure.
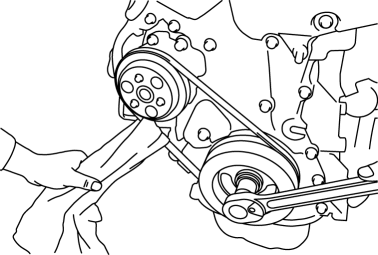
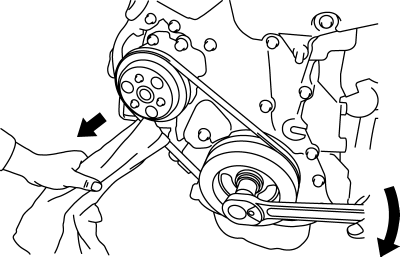
3. Pull the cloth in the direction of the arrow and rotate the crankshaft pulley clockwise.
CAUTION:
-
To prevent damaging the drive belt, do not stop rotating the crankshaft pulley while performing the removal procedure (with inserted cloth between drive belt and water pump pulley).
NOTE:
-
The rib of the drive belt can be slid from the groove of the water pump pulley by rotating the crankshaft pulley while pulling the cloth in the direction of the arrow.
4. Remove the water pump drive belt.
Installation
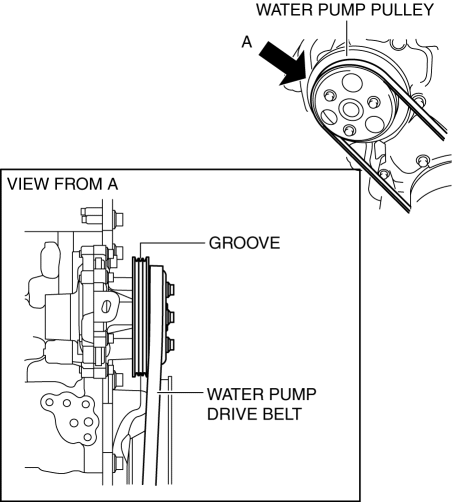
1. Set one side of the water pump drive belt into the groove of the crankshaft pulley.
2. Set the other side of the water pump drive belt into the groove of the water pump pulley with the smaller circumference.
CAUTION:
-
Be careful not to get a finger caught in between the drive belt and pulley when performing the following procedure.
-
Wearing gloves could result in fingers getting caught between the drive belt and pulley. Do not wear cotton gloves when performing the procedure.
3. Press the drive belt up from the smaller circumference pulley into the groove of the larger circumference pulley, and rotate the crankshaft pulley clockwise.
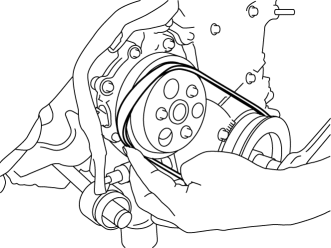
CAUTION:
-
To prevent damaging the drive belt, do not stop rotation of the crankshaft pulley while pressing the drive belt up from the height difference of the water pump pulley to the groove of the pulley.
4. After drive belt installation, rotate the crankshaft pulley clockwise approx. halfway and verify that the water pump drive belt is installed correctly.
-
If the rib of the drive belt and the groove of the pulley are not aligned, remove the drive belt and re-install it.
5. Install the generator drive belt..
 Drive Belt Inspection
Generator Drive Belt
NOTE:
The generator drive belt deflection/tension inspection is not necessary with
the adoption of the drive belt auto tensioner.
1. Verify that the indicator pa ...
 Drive Belt
Purpose, Function
The drive belt transmits rotation force of the crankshaft pulley to the pulley
for the auxiliary parts.
Construction
The drive belt is installed to the front o ...
Other materials:
Cruise Main Indicator Light (Amber)
Purpose/Function
Illuminates while the cruise control system is in standby mode to inform
the driver that the cruise control system is on standby.
Construction
Built into the instrument cluster.
Operation
Illuminates while the cruise control system is on sta ...
Headlight High Beam Indicator Light
Purpose
Notifies the user that the headlights (HI) are illuminated.
Function
Illuminates when the headlight (HI) or parking illumination conditions are
met.
Construction
Displayed in the instrument cluster.
Operation
1. When the light switch is operat ...
Filament Inspection
1. Switch the ignition ON (engine off).
2. Turn the rear window defroster switch on.
CAUTION:
Directly touching the rear window defroster filament with the lead of the
tester could damage it. Wrap aluminum foil around the end of the lead and inspect
the filament by touching it ...
