Mazda CX-5 Service & Repair Manual: D Pillar Speaker Removal/Installation
1. Disconnect the negative battery cable..
2. Remove the following parts:
a. Trunk board.
b. Trunk end trim.
c. Rear scuff plate.
d. Trunk side trim.
e. D-pillar trim.
3. Disconnect the connector.
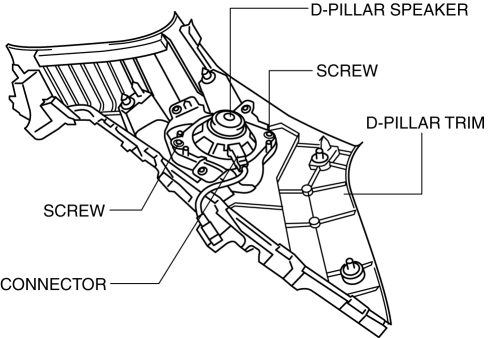
4. Remove the screws.
5. Remove the D-pillar speaker.
6. While pressing the tabs of the clip in the direction of the arrow (1) shown in the figure, press it in the direction of the arrow (2) to detach the short-cord clip from the D-pillar trim.
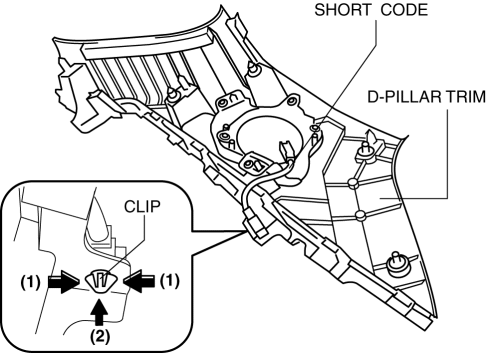
7. Remove the short cord.
8. Install in the reverse order of removal.
 D Pillar Speaker Inspection
D-pillar speaker
1. Disconnect the negative battery cable..
2. Remove the following parts:
a. Trunk board.
b. Trunk end trim.
c. Rear scuff plate.
d. Trunk side trim.
e. D-pillar trim.
...
 Entertainment System
Outline
The following entertainment system has been adopted.
Audio system (with audio system)
Car-navigation system (with car-navigation system)
Park assist s ...
Other materials:
Audio Unit (With Color LCD)
NOTE:
“iPod” is a registered trademark of Apple Inc. in the United States and other
countries.
Purpose
The audio unit controls the CD, radio, exterior input devices (AUX/USB/iPod)
and the display.
Function
Records the following items which the user has set ...
Differential [Fw6 A EL, Fw6 Ax EL]
Purpose/Function
The differential absorbs the difference in the rotation speed between the
left and right driving wheels so that the vehicle drives smoothly when differences
occur due to cornering or driving on rough roads.
Construction
The differential consists of the ring ...
Solar Radiation Sensor Inspection [Full Auto Air Conditioner]
1. Shine a fluorescent light or expose the solar radiation sensor to natural
sunlight.
2. Connect the positive (+) lead to terminals B, C and negative (-) lead to terminal
A of the solar radiation sensor, and verify that the voltage value is output.
If the voltage is 0 V, replace ...
