Mazda CX-5 Service & Repair Manual: Construction Standard Values [Construction Standard Values]
Front view

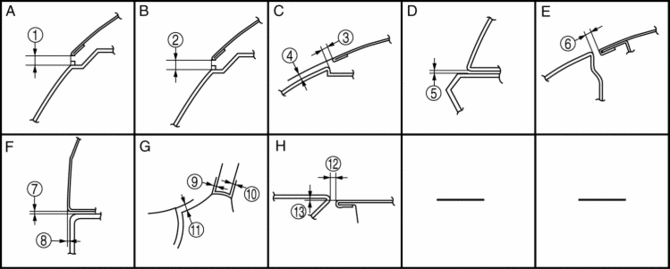
|
No. |
Measurement part |
Standard values (mm {in}) |
Maximum values (mm {in}) |
Minimum values (mm {in}) |
Side by difference (mm {in}) |
|
A |
1 |
5.0 {0.20} |
7.0 {0.27} |
3.0 {0.12} |
2.0 {0.079} |
|
B |
2 |
4.5 {0.18} |
6.0 {0.24} |
3.0 {0.12} |
- |
|
C |
3 |
4.5 {0.18} |
6.4 {0.25} |
2.6 {0.10} |
2.5 {0.098} |
|
4 |
1.0 {0.039} |
2.8 {0.11} |
-0.8 {-0.03} |
- |
|
|
D |
5 |
1.8 {0.055} |
3.2 {0.13} |
0.4 {0.002} |
1.4 {0.055} |
|
E |
6 |
3.7 {0.15} |
4.9 {0.19} |
2.5 {0.098} |
1.2 {0.047} |
|
F |
7 |
0.5 {0.02} |
1.8 {0.071} |
- |
- |
|
8 |
0.5 {0.02} |
1.2 {0.047} |
0.2 {0.008} |
- |
|
|
G |
9 |
0 |
1.6 {0.063} |
-1.6 {-0.063} |
- |
|
10 |
0 |
1.6 {0.063} |
-1.6 {-0.063} |
- |
|
|
11 |
0 |
1.5 {0.059} |
-1.5 {-0.059} |
- |
|
|
H |
12 |
3.5 {0.14} |
4.5 {0.18} |
2.5 {0.098} |
1.0 {0.039} |
|
13 |
0 |
1.0 {0.039} |
-1.0 {-0.039} |
- |
Rear view
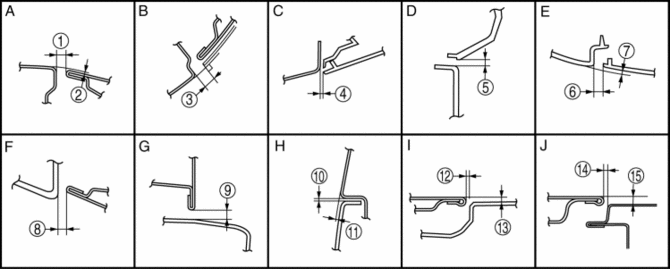
|
No. |
Measurement part |
Standard values (mm {in}) |
Maximum values (mm {in}) |
Minimum values (mm {in}) |
Side by difference (mm {in}) |
|
A |
1 |
6.0 {0.24} |
7.0 {0.28} |
5.0 {0.20} |
1.2 {0.047} |
|
2 |
-1.0 {-0.039} |
0 |
-2.0 {-0.079} |
- |
|
|
B |
3 |
4.3 {0.17} |
6.8 {0.27} |
1.8 {0.071} |
2.5 {0.047} |
|
C |
4 |
1.8 {0.071} |
3.0 {0.12} |
0.6 {0.02} |
- |
|
D |
5 |
1.8 {0.071} |
3.3 {0.13} |
0.3 {0.01} |
- |
|
E |
6 |
4.5 {0.18} |
6.5 {0.26} |
2.5 {0.098} |
1.5 {0.059} |
|
7 |
0 |
1.8 {0.071} |
-1.8 {-0.071} |
- |
|
|
F |
8 |
4.0 {0.16} |
6.5 {0.26} |
1.5 {0.059} |
2.5 {0.098} |
|
G |
9 |
6.0 {0.24} |
8.0 {0.31} |
4.0 {0.16} |
2.0 {0.079} |
|
H |
10 |
0.5 {0.02} |
1.8 {0.071} |
- |
- |
|
11 |
0.5 {0.02} |
1.5 {0.059} |
-0.2 {-0.008} |
- |
|
|
I |
12 |
3.5 {0.14} |
4.5 {0.18} |
2.5 {0.098} |
1.0 {0.039} |
|
13 |
0 |
1.0 {0.039} |
-1.0 {-0.039} |
- |
|
|
J |
14 |
3.5 {0.14} |
4.5 {0.18} |
2.5 {0.098} |
1.0 {0.039} |
|
15 |
0 |
1.0 {0.039} |
-1.0 {-0.039} |
- |
 Center Pillar Removal [Panel Replacement]
Symbol Mark
Removal Procedure
CAUTION:
Remove the curtain air bag module to prevent damage before servicing.
Front-side
Rear-side
CAUTION:
Avoid cutting with a bl ...
 Corner Plate Installation [Panel Replacement]
Symbol Mark
Installation Procedure
1. When installing new parts, measure and adjust the body as necessary to conform
with standard dimensions.
2. Drill holes for the plug welding before inst ...
Other materials:
Rear Trailing Link Removal/Installation
1. Remove the floor under cover..
2. Disconnect the rear parking cable..
3. Remove in the order indicated in the table.
4. Install in the reverse order of removal.
5. Inspect the wheel alignment and adjust it if necessary..
1
Rear trailing link installatio ...
Auxiliary Jack/Usb Port Inspection
Auxiliary jack inspection
1. Disconnect the negative battery cable..
2. Remove the following parts:
a. Upper console.
b. Auxiliary jack/USB port.
3. Connect a commercially-available plug to the external input unit.
4. Verify that the continuity between the external input unit terminal ...
Windshield Washer Hose Removal/Installation
1. Disconnect the negative battery cable..
2. Remove the front over fender..
3. Remove the mudguard (RH)..
4. Remove the windshield wiper arm and blade..
5. Disconnect the windshield washer hose A from the washer motor.
6. Remove the windshield washer hose A from the washer tank hook.
7. ...
