Mazda CX-5 Service & Repair Manual: Column Cover Removal/Installation
1. Pull down the steering wheel.
2. Press the shaded area shown in the figure using your thumb, and lift the upper column cover in the direction of arrow (1).
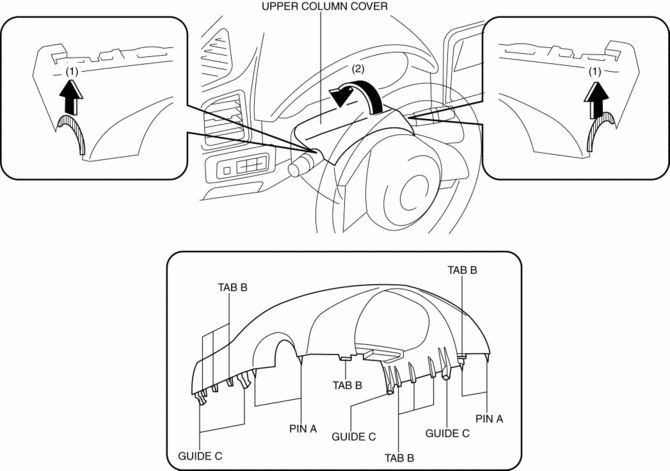
3. Pull the upper column cover in the direction of the arrow (2) and remove it while detaching pins A, tabs B and guides C.
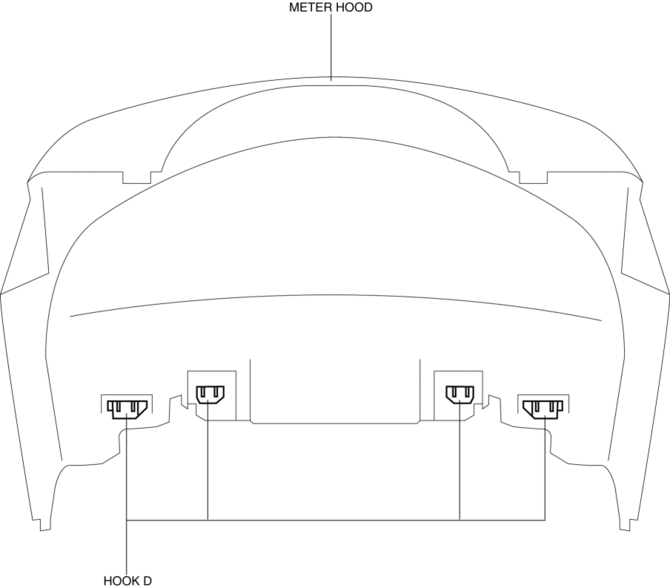
4. Remove hooks D from the meter hood.
CAUTION:
-
If the cover of the meter hood is deformed, it may not return to its original condition. When removing the cover of the meter hood, detach hooks D one by one from the upper column cover.
5. Pull up the steering wheel.
6. Remove screws E.
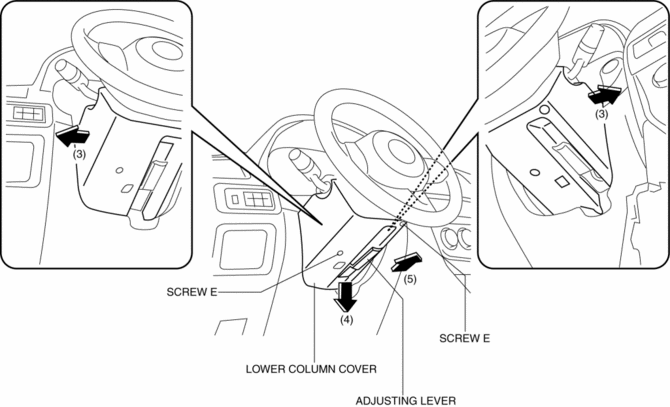
7. Remove the lower column cover in the direction of the arrow (4), (5) set the adjusting lever aside while keeping it open in the direction of the arrow (3) shown in the figure.
8. Install in the reverse order of removal.
 Center Panel Removal/Installation
1. Disconnect the negative battery cable..
2. Remove the decoration panel.
3. Take the shaded area shown in the figure, and pull the center panel in the
direction of the arrow in the order of (1 ...
 D Pillar Trim Removal/Installation
1. Disconnect the negative battery cable..
2. Remove the following parts:
a. Trunk board.
b. Trunk end trim.
c. Rear scuff plate.
d. Trunk side trim.
3. Take the shaded area shown in the f ...
Other materials:
Rain Sensor
Outline
The rain sensor detects the amount of rainfall and calculates the wiper operation
speed, and outputs a windshield wiper control signal to the front body control
module (FBCM) to perform automatic wiper operation (auto wiper system) according
to the amount of rainfall.
...
Installing Child-Restraint Systems
Accident statistics reveal that a child is safer in the rear seat. The front
passenger's seat is clearly the worst choice for any child under 12, and with rear-facing
childrestraint systems it is clearly unsafe due to air bags.
NOTE
Even if your vehicle is equipped with front passenger sea ...
Active Command Modes Inspection [Blind Spot Monitoring (Bsm)]
1. Connect the M-MDS to the DLC-2.
2. After the vehicle is identified, select the following items from the initialization
screen of the M-MDS.
a. Select “DataLogger”.
b. Select “Modules”.
c. Select “BSML” or “BSMR”.
3. Select the simulation items from the PID table.
4. ...
