Mazda CX-5 Service & Repair Manual: Clock Spring Removal/Installation [Two Step Deployment Control System]
CAUTION:
-
If the disc on the combination switch is deformed or has foreign material adhering to it, performance of the steering angle sensor may be reduced, causing abnormal operation. When handling the clock spring, be careful not to deform the disc and make sure there is no foreign material on it.
1. Switch the ignition to off.
2. Disconnect the negative battery cable and wait for 1 min or more
..
3. Remove the driver?side air bag module..
4. Remove the steering wheel..
5. Remove the column cover..
6. Disconnect the clock spring connector.
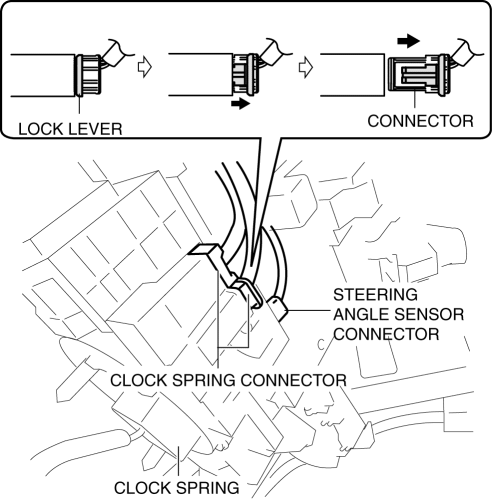
7. Disconnect the steering angle sensor connector. (with steering angle sensor)
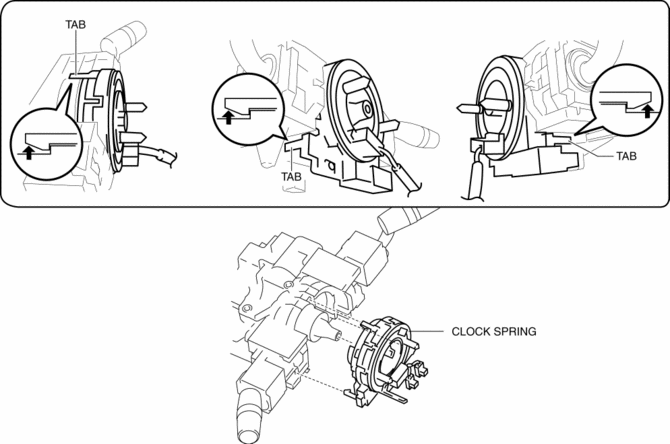
8. Remove the tab direction of the arrow shown in the figure and remove the clock spring.
9. Install in the reverse order of removal..
10. Verify that the air bag system warning light illuminates for approx. 6 s
and goes out.
-
If the air bag system warning light does not operate in the manner described above, there are malfunctions in the system. Inspect the system using the on-board diagnostic..
Clock Spring Installation Note
CAUTION:
-
If the clock spring is not adjusted, the spring wire in the clock spring will break due to overtension when the steering wheel is turned. Always adjust the clock spring after installing it.
-
Adjust the clock spring after installing it..
 Clock Spring Removal/Installation [Standard Deployment Control System]
CAUTION:
If the disc on the combination switch is deformed or has foreign material
adhering to it, performance of the steering angle sensor may be reduced, causing
abnormal operation. Wh ...
 Instrument Cluster
Outline
The instrument cluster centrally controls the speedometer, tachometer, odometer/tachometer,
fuel gauge, warning/indicator lights, trip computer, warning sounds and panel
lights.
...
Other materials:
Vehicle Loading
This section will guide you in the proper loading of your vehicle and/or trailer,
to keep your loaded vehicle weight within its design rating capability, with or
without a trailer.
Properly loading your vehicle will provide maximum return of vehicle design performance.
Before loading your vehi ...
High Mount Brake Light
Purpose
The high-mount brake light signals vehicles to the rear that the vehicle
is stopped.
Function
The high-mount brake light illuminates in conjunction with the operation
of the brake light switch.
Construction
The high-mount brake light is positioned on th ...
Glass Antenna
Purpose, Function
The RDS (Radio Data System) converts radio broadcast waves to electric signals
and sends the signals to the audio unit.
Construction
An antenna with excellent noise resistance has been adopted to the rear window
glass.
Fail-safe
Function n ...
