Mazda CX-5 Service & Repair Manual: B Pillar Upper Trim Removal/Installation
1. Remove the following parts:
a. Front scuff plate.
b. Rear scuff plate.
c. B-pillar lower trim.
d. Adjuster anchor cover.
e. Upper anchor installation bolts on the front seat belt.
2. Partially peel back the seaming welt.
3. Take the shaded area shown in the figure, and pull the B-pillar upper trim in the direction of the arrow (1) while detaching clips A, pin B, pin C.
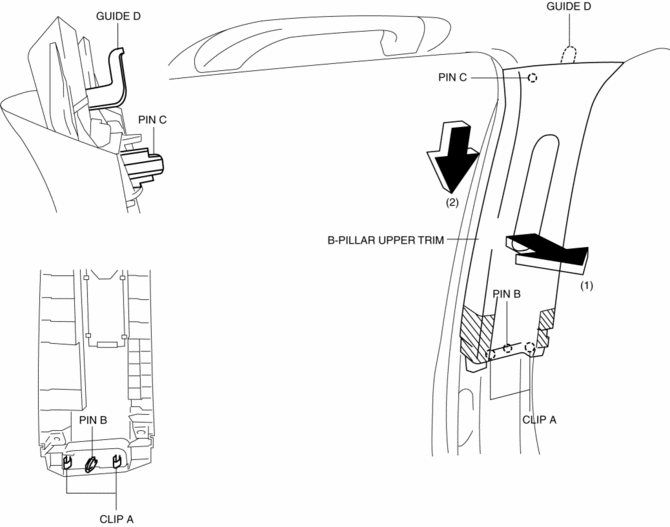
4. Remove the B-pillar upper trim in the direction of the arrow (2) shown in the figure while detaching the guide D.
CAUTION:
-
If clips A, pin B and pin C is removed forcefully, guide D may be damaged. Carefully remove clips A, pin B and pin C so as not to damage guide D.
5. Install in the reverse order of removal.
 B Pillar Lower Trim Removal/Installation
1. Remove the front scuff plate..
2. Remove the rear scuff plate..
3. Partially peel back the seaming welt.
4. Take the shaded area shown in the figure, and pull the B-pillar lower trim
in the ...
 C Pillar Trim Removal/Installation
1. Disconnect the negative battery cable..
2. Remove the following parts:
a. Trunk board.
b. Trunk end trim.
c. Rear scuff plate.
d. Trunk side trim.
e. D-pillar trim.
3. Partially peel ...
Other materials:
Ventilator Grille Removal/Installation
Side Ventilator Grille
Driver-side
1. Disconnect the negative battery cable..
2. Remove the switch panel..
3. Insert your hand from the area where the switch panel was installed, remove
the side ventilator grille in the direction of the arrow shown in the figure while
detaching hooks A.
...
Theft Deterrent Horn Inspection
1. Disconnect the negative battery cable..
2. Remove the following parts:
a. Trunk end trim.
b. Rear scuff plate (RH).
c. Trunk side trim (RH).
d. Theft-deterrent horn.
3. Apply battery positive voltage to horn terminal A, and connect the horn retaining
bolt to ground as shown in the f ...
Key Warning Light (Red)/Key Indicator Light (Green)
Purpose
KEY warning light (red)
The KEY warning indicator light (red) notifies the user that the engine cannot
be started, the remote transmitter is outside of the vehicle, or that there
is a malfunction in the system.
KEY indicator light (green)
The KEY indicator light (g ...
