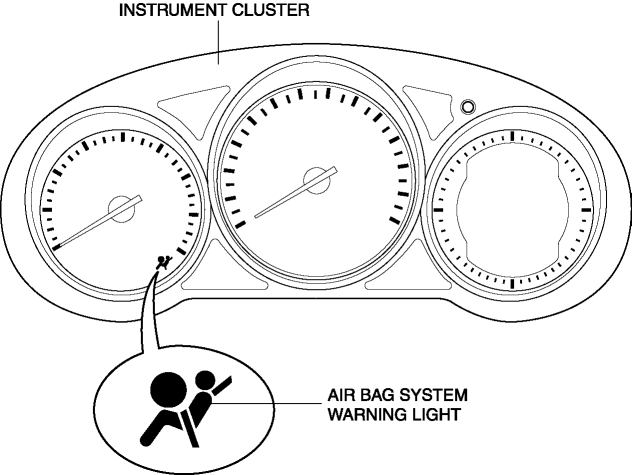
Mazda CX-5 Service & Repair Manual: Air Bag System Warning Light [Standard Deployment Control System]
Purpose
-
The air bag system warning light notifies the driver of a malfunction in the SRS air bag system.
Function
-
If a malfunction occurs in the SRS air bag system, the air bag system warning light illuminates or flashes.
Construction
-
LEDs (light-emitting diode) have been adopted for the air bag system warning light.
-
The air bag system warning light is built into the instrument cluster.
Operation
-
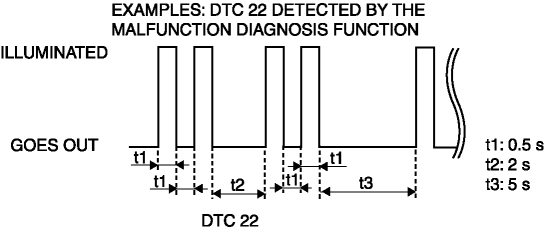
When the ignition is switched ON, the instrument cluster illuminates the air bag system warning light for a specified period to indicate that the SRS air bag system is performing initialization diagnostics. If there is no malfunction in the SRS air bag system, the indicator light turns off.
-
If the SAS control module detects a malfunction in the SRS air bag system, it sends a warning signal to the instrument cluster via CAN communication. The instrument cluster illuminates or flashes the air bag system warning light based on the warning signal it receives to display the DTC.
-
If there is a malfunction in the SRS air bag system, the air bag system warning light displays DTCs according to the following patterns:
-
If there are several malfunctions in the SRS air bag system, the DTC of the highest priority ranking is displayed first.
Fail-safe
-
Function not equipped.
 Afs Off Indicator Light
Purpose
The AFS OFF indicator light notifies the user that the AFS is stopped or
a malfunction occurs in the AFS.
Function
The AFS OFF indicator light illuminates when the AFS i ...
 Air Bag System Warning Light [Two Step Deployment Control System]
Purpose
The air bag system warning light notifies the driver of a malfunction in
the SRS air bag system.
Function
If a malfunction occurs in the SRS air bag system, the air bag ...
Other materials:
Accelerator Pedal Removal/Installation
1. Disconnect the negative battery cable..
2. Remove in the order indicated in the table.
1
APP sensor connector
2
Accelerator pedal
3. Install in the reverse order of removal. ...
Rear Crossmember Removal/Installation [Awd]
WARNING:
Verify that the crossmember is securely supported by a jack. If the rear
crossmember falls off, it can cause serious injury or death, and damage to the
vehicle.
CAUTION:
Performing the following procedures without first removing the rear ABS wheel-speed
sensor ...
Interior Equipment (View B)
1 Audio control switches
2 SRS air bags
3 Cruise control switches
4 Navigation system (if equipped)
5 Audio system
6 Hazard warning flasher switch
7 Climate control system
8 Glove compartment
9 Rear window defroster switch
10 Accessory socket
11 MT shift lever
12 AT shift lever ...
