Mazda CX-5 Service & Repair Manual: Antenna Feeder No.1 Inspection
With audio system
1. Disconnect the negative battery cable..
2. Remove the following parts:
a. A-pillar trim (RH).
b. Decoration panel.
c. Audio unit.
3. Disconnect antenna feeder No.2.
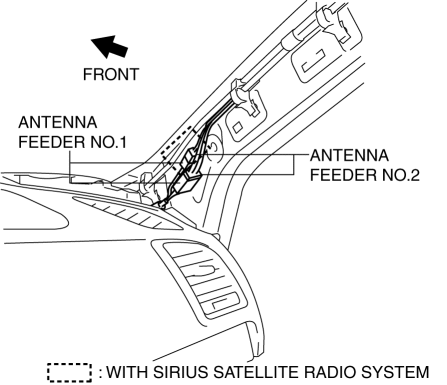
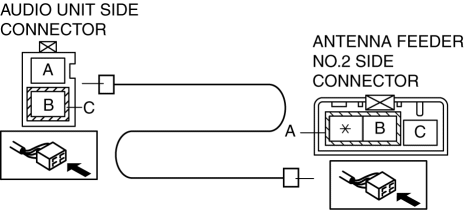
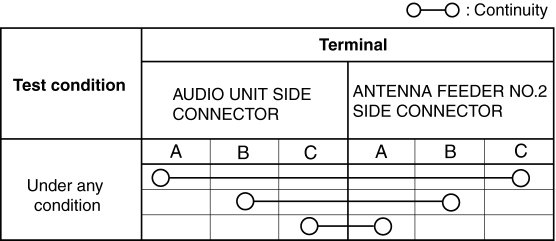
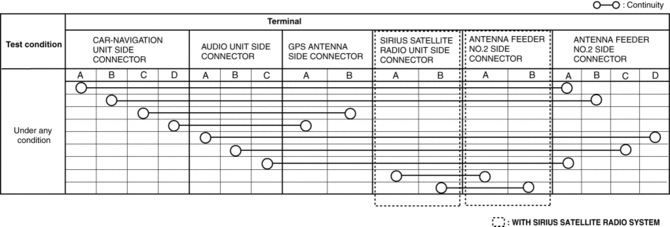
4. Verify that the continuity between antenna feeder No.1 terminals is as indicated in the table.
-
If not as indicated in the table, replace antenna feeder No.1.
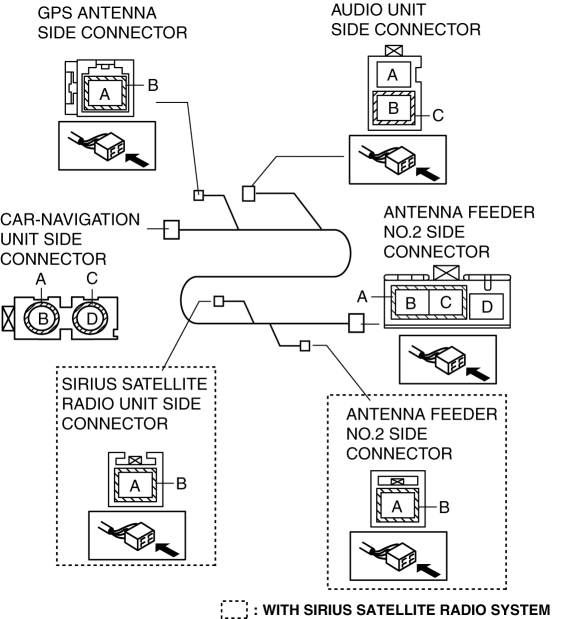
With car-navigation system
1. Disconnect the negative battery cable..
2. Remove the following parts:
a. A-pillar trim (RH).
b. Decoration panel.
c. Audio unit.
d. Center speaker grille.
e. Front center speaker (with Bose®)/front center speaker dummy (without Bose®).
f. Car-navigation unit.
3. Disconnect the GPS antenna connector..
4. Disconnect antenna feeder No.2.
5. Verify that the continuity between antenna feeder No.1 terminals is as indicated in the table.
-
If not as indicated in the table, replace antenna feeder No.1.
 Entertainment
...
 Antenna Feeder No.1 Removal/Installation
With audio system
1. Disconnect the negative battery cable..
2. Remove the following parts:
a. Side speaker grille (RH).
b. Tweeter (RH).
c. A-pillar trim.
d. Passenger-side front scuff pla ...
Other materials:
Steps for Determining the Correct Load Limit
Steps for Determining Correct Load Limit-
(1) Locate the statement “The combined weight of occupants and cargo should never
exceed XXX kg or XXX lbs” on your vehicle's placard.
(2) Determine the combined weight of the driver and passengers that will be riding
in your vehicle.
(3) Subt ...
Center Roof Antenna
Purpose, Function
Converts radio broadcast waves to electric signals and sends the signals
to the audio unit.
Construction
A center roof antenna has been adopted which does not require retraction
or removal before going through an automatic car wash machine.
The ...
Audio Unit Personalization Features Setting Procedure
Door Locks Systems
1. Switch the ignition ON (engine off or on).
2. Turn the audio unit power on.
3. Select the following from the audio unit screen.
a. “Setup”
b. “Vehicle”
c. “Door Locks“
4. Select the following items and change the setting.
Advanced keyless entry system ...
